Happy Holidays!

![]() Subscribe to RSS Feed
Subscribe to RSS Feed
Hey guys - it's been a while since I've posted a tutorial. I've been terribly busy with my school studies, that I barely have time for myself, let alone write a tutorial. But now that I am done exams and the holiday season is upon us, here is my gift for fellow readers out there. I hope you enjoy it!
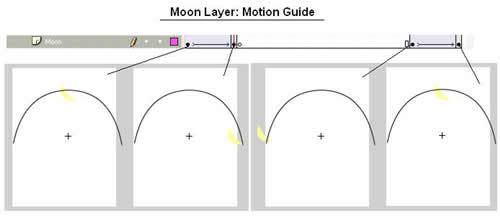
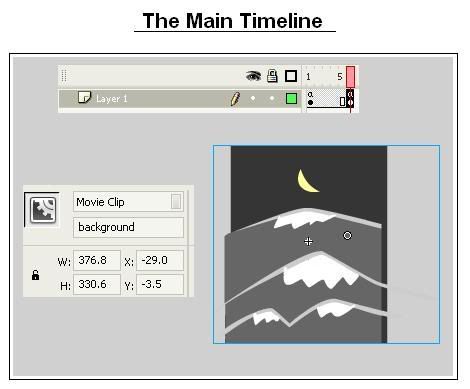
Dynamic Wallpaper: Part 1: Sunrise, Sunset
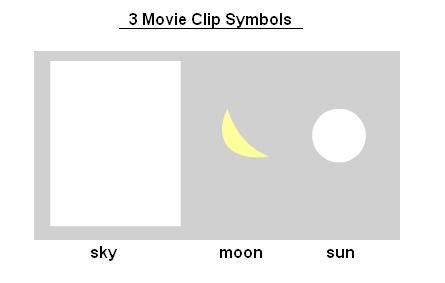
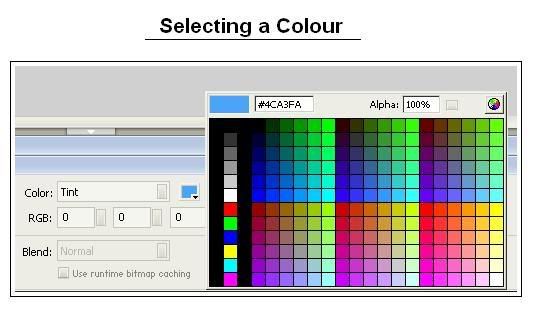
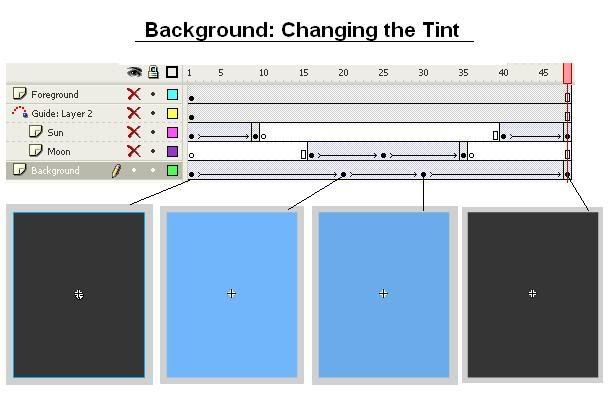
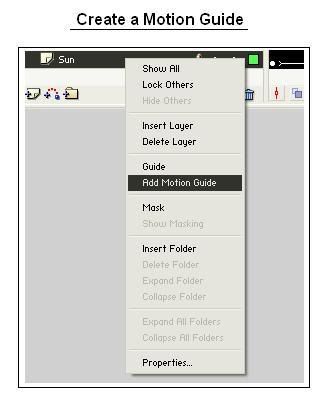
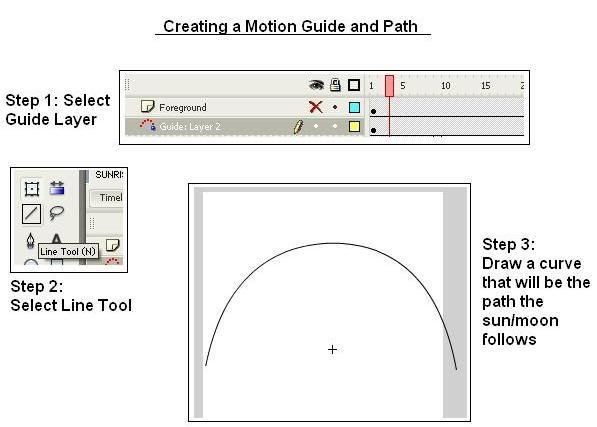
With the onset of new SE phones being able to support standby swfs, we see a growing number of standby swfs that are animated in such a way that they change according to the time of day. Wouldn't it be nice to see an evening landscape when it's dark out and a bright meadow during the afternoon? Let's see how this is done!
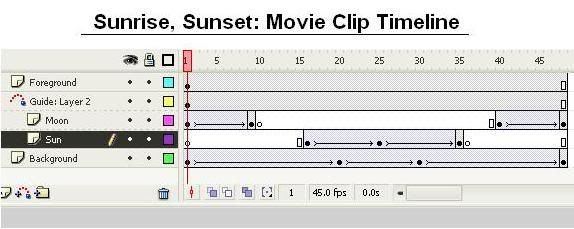
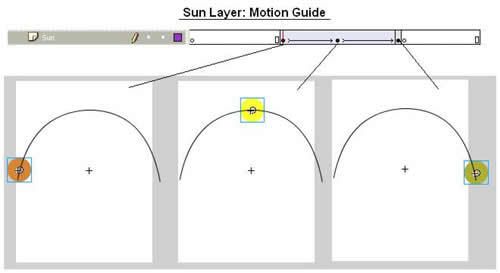
//this will get the current time and convert it to a number between 1 and 48.
/:theHour=FSCommand2("GetTimeHours") * 2;
/:theMinutes=FSCommand2("GetTimeMinutes");
/:hourFraction = Math.round((/:theMinutes/60) * 2);
tellTarget("background"){
gotoAndStop(/:theHour+/:hourFraction+1);
}
gotoAndPlay(1);
Labels:
dynamic wallpaper sunrise sunset flash lite tutorial
![]() Subscribe to RSS Feed
Subscribe to RSS Feed
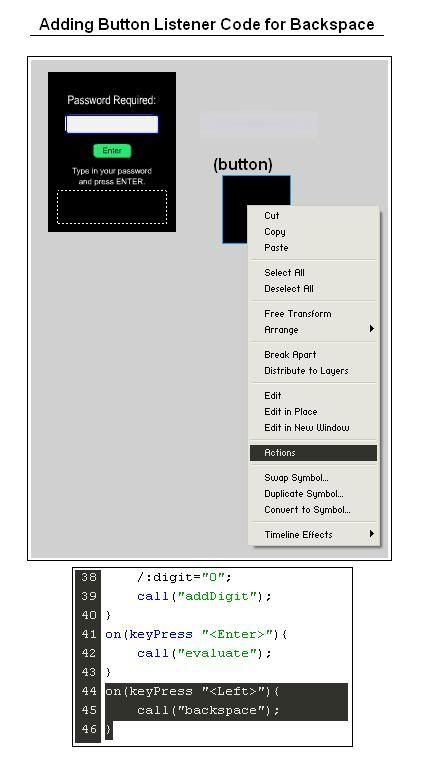
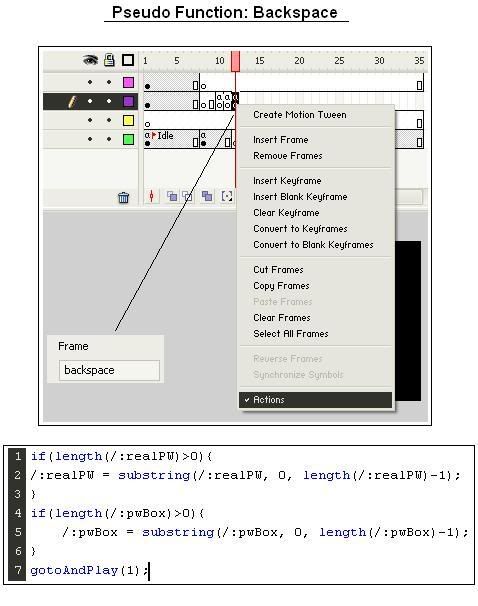
In the previous Password Protection Tutorial, we explored a simple solution to creating a password entry prompt that enables a certain degree of privacy when accessing their flash lite menu. I have received a couple responses from users wanting to know how to create a backspace function so that if the user accidentally keys in the wrong digit, they can 'backspace' and re enter something new. Here is what I'm talking about:
string The string from which to extract the new string.index The number of the first character to extract.count The number of characters to include in the extracted string, not including the index character.
Labels:
string functions flash lite backspace
![]() Subscribe to RSS Feed
Subscribe to RSS Feed

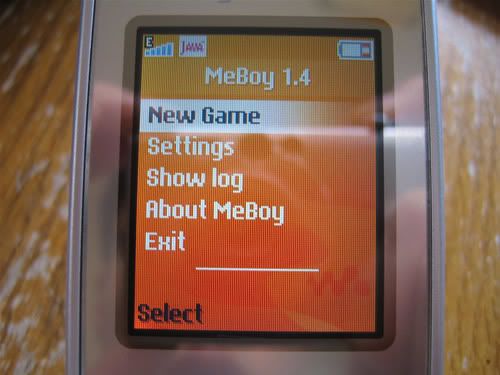
This tutorial will teach you how to create a Flash Lite game playable on the Flash Lite Player version 1.1 - one of the earliest versions and most restricted, but the most widely spread version as well. Our basic game could be created without using the advanced features provided in later versions. Adopting Flash Lite 1.1 will guarantee that the game will be compatible with the largest possible number of Flash Lite powered devices.
![]() Subscribe to RSS Feed
Subscribe to RSS Feed
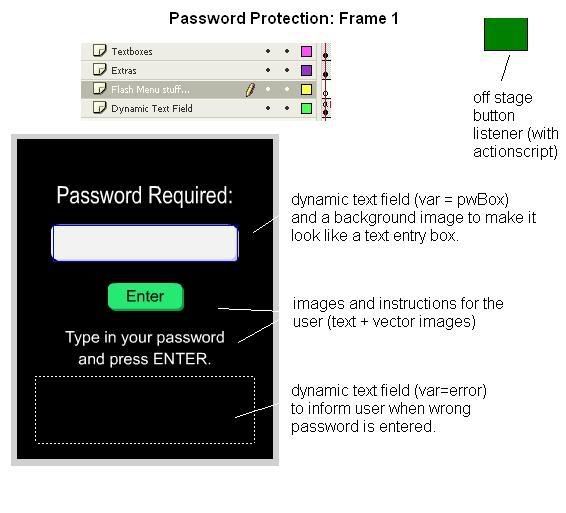
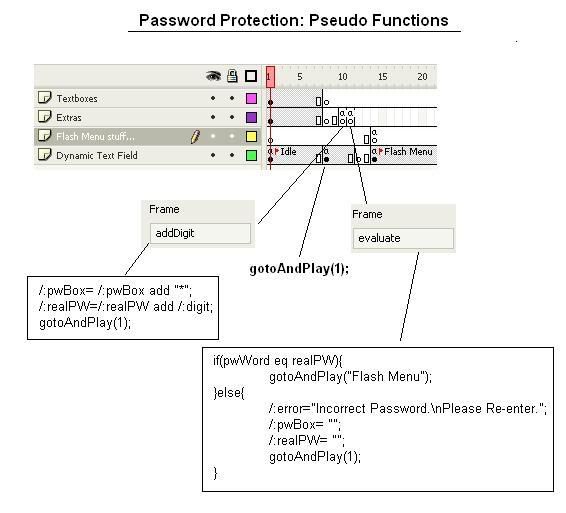
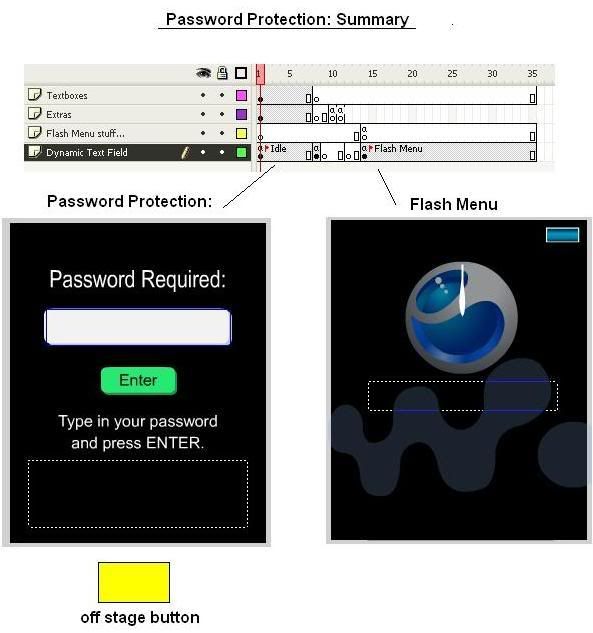
Lots of people I see on SE forums want their flash menu customized so that they are password protected. I guess it gives an extra dimension of privacy which is important for some. In this tutorial, we'll look at a simple solution to creating a fully functional password screen that can be customizable to whatever numerical password you wish.
This will be Part 1, which will give you the basics on how to create this password protection. Note that this is a simplified version and we will cover other things (how to backspace) in later tutorials. Here is a preview. Click on the swf and enter the password (15402) and press Enter.
Labels:
password protect flash menu
![]() Subscribe to RSS Feed
Subscribe to RSS Feed
Is it possible to create functions in Flash Lite 1.1? I'm having problems getting it to work...
This is good question. First off, Flash Lite 1.1 does not support functions. This is a major drawback, as applications, especially games use functions to impart versatility and efficiency. Fortunately, there is a solution to this problem, and it is in the form of the function call():
call(frame);
To illustrate this concept, place a button listener on stage, and enter the following code, by right clicking and selecting options:
on (keyPress "1"){
call("jimmy");
}
In the above code, jimmy refers to the frame name that will we will be executing code from. Now extend the duration of frames to 5 frames. On Frame 5, add:
gotoAndPlay(1);
This guarantees that your movie will be always within frames 1 and 5. Now, add a blank keyframe on frame 6 so that the button is not on stage. Name this frame jimmy. Add the following code:
trace("Code executed!");
Now, compile the code and see for yourself. When you press '1', it will pop up with a message window (in your emulator) saying "Code executed!". This shows that the code from frame 6 was executed. More importantly, it DOES NOT move the movie to that particular frame (your button is still on stage, meaning its still playing between frames 1 and 5). In essence, we are just calling the code from that particular frame, and NOT playing the content of that frame. From CS3 Documentation:
The default form executes the script on the specified frame of the same timeline where the call() function was executed, without moving the playhead to that frame.
So as you can see, this is pretty much equivalent to creating functions. The only difference is that each labelled keyframe you make represents a different function. For best practice, you can place these at the end of your movie so it doesn't interject anywhere and also helps make your movie more organized.
Labels:
create functions flash lite call function
![]() Subscribe to RSS Feed
Subscribe to RSS Feed
When I start browsing around the internet to look for interesting flash lite applications for Sony Ericsson phones, the majority of results land on flash lite menus. Let's face it, they're slick, animated and aesthetically pleasing: who wouldn't want one? Everyone wants a cool flash lite menu to show off to their peers. I would've expected this potential area of interest to be booming at a phenomenal rate, but the fact of the matter is that SE makes it very hard for us to create and implement these menus.
First, let's consider how one needs to implement these flash lite menus. It's not something an ordinary cell phone user can achieve without learning and download tutorials on the special programs, drivers, files needed to get the flash files into the right directory. Moreover, you risk screwing up your phone if the process of moving that file somehow goes wrong. Let's not forget that the programs do not currently support CID 51/52. Because the directory in which swf files exist are within the file system of the phone, one can not just plop the file into their internal or external memory to expect it to work. This is by far the biggest problem that's limiting this sector from expanding.
Many of you have contacted me with potential ideas on how to get around this idea, but after several weeks of fidgeting with directories and themes.xml, I'm afriad I can't find a solution to this problem. It really seems as though SE wants to keep this flash lite creation business in control. With no leads as to what the solution is, my attempts are comparable to finding a needle in a haystack.
Second, there are very little resources out there that teach people how to create these menus. Albeit, there are intelligent, and generous users out on forums who dedicate their time on understanding how the code works with flash decompilers and hex code editing, but it's very tedious and time consuming. That's one reason why this site exists. So for those users out there who think it's super easy to convert FL2 to FL1.1, or changing resolutions, take some time and think about the amount of work needed just to change something. In fact, I have yet to see that many flash menus created from scratch; most of them are just slight variations on flash menus created by SE.
Lastly, SE's flash lite only works in browsers and may the prime reason why animations run so poorly on several select phones. On the bright side, we are seeing more phones compatible with flash wallpapers that do not require a specific directory to operate. While the current outlook on flash lite expansion seems like a struggle, I am truly optimistic that SE can turn things around by realizing how many potential flash lite developers are interested in creating applications for their cellphones.
Labels:
flash lite sony ericsson
![]() Subscribe to RSS Feed
Subscribe to RSS Feed
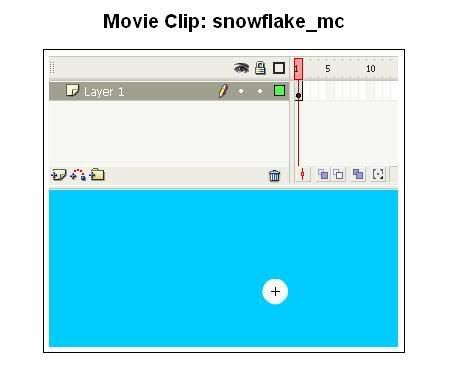
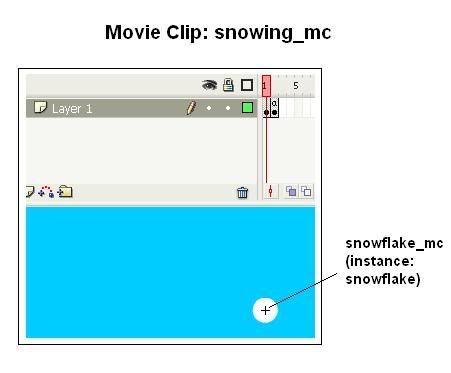
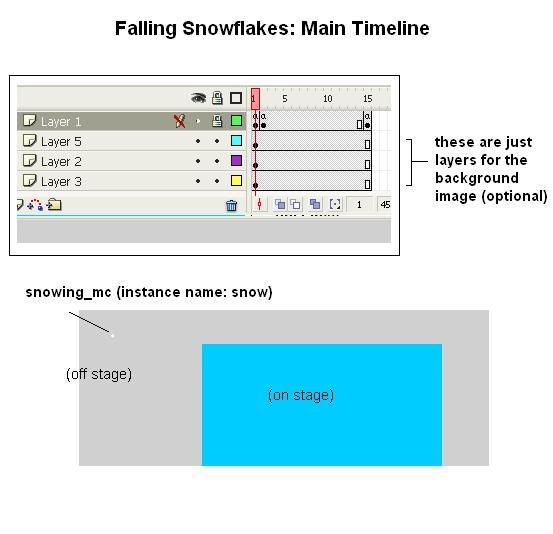
We continue our series of useful dynamic aesthetics with one associated with the winter season. Wouldn't it be nice to have a nice snowy landscape as a wallpaper and better yet, have snowflakes falling in the forefront? We will discuss in this tutorial how to transform your ordinary snowy landscape into a winter wonderland!

Labels:
falling snowflakes tutorial
![]() Subscribe to RSS Feed
Subscribe to RSS Feed
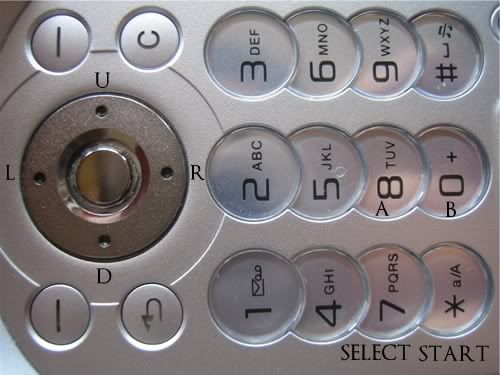
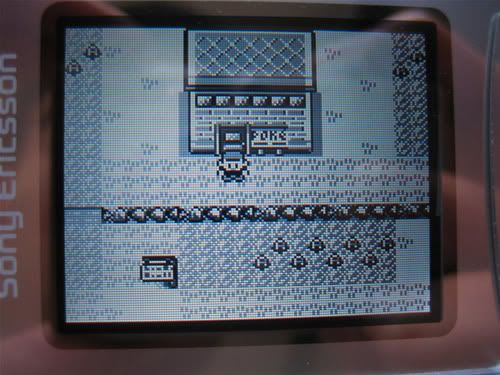
Let's take a rest from Flash Lite just for a minute. I just came across this really cool application called MeBoy: MeBoy is a Gameboy emulator for mobile phones (which means you can use it to play Gameboy games on a mobile phone). It works on phones with support for Java Micro Edition, specifically MIDP 2.0. Your phone manufacturer's web site can tell you if this includes your phone.
Labels:
meboy emulator sony ericsson
![]() Subscribe to RSS Feed
Subscribe to RSS Feed
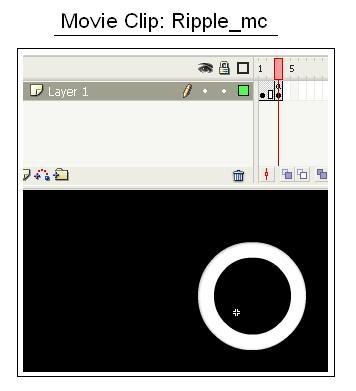
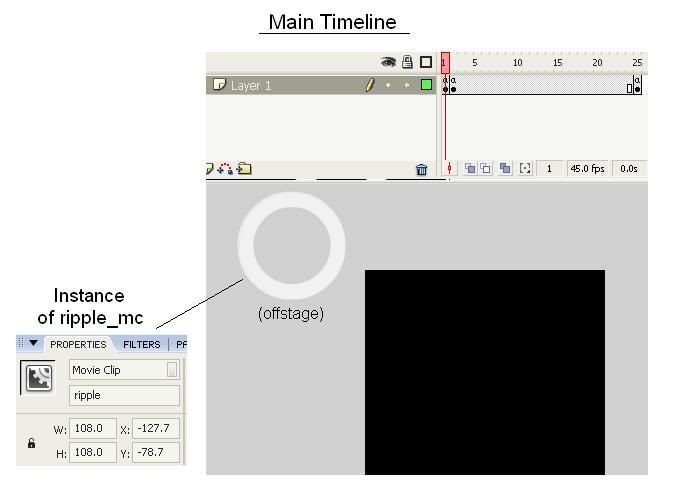
Labels:
random ripple tutorial
![]() Subscribe to RSS Feed
Subscribe to RSS Feed
What is the actionscript that receives the music info from those standby menus?
Taking a look at some commercial SE standby swfs, it looks like the key to displaying music information is the following command:
loadVariables("MP:",_root)
However, it seems as though this function is only supported in phones that run walkman player 2.0 [credit: peter3334], which are usually the phones that are able to run wallpapers. From here, it looks as though the variables imported are: TITLE, ARTIST and ALBUM. The actionscript associated with displaying, updating and formatting this information definitely seems more complicated than the ordinary flash lite menu...
Labels:
import music SE
![]() Subscribe to RSS Feed
Subscribe to RSS Feed
Lithium3r has taken the time to convert a FL2.0 standby (for the w910) to FL1.1 standards, allowing many more SE phones to run this nice standby menu. Way to go! Here is a screenie:

Labels:
w910 standby convert
![]() Subscribe to RSS Feed
Subscribe to RSS Feed
Some users have shown interest in learning how to incorporate sound into flash lite menus and other applications. Here is a very nice starting point: a tutorial from SE outlining the necessary steps to implementing sounds into FL1.1
Getting started with sound in Macromedia Flash Lite 1.1
Labels:
sound flash lite 1.1
![]() Subscribe to RSS Feed
Subscribe to RSS Feed
I'm happy to announce that the latest flash lite menu is available for download. This new menu, called 'Aura' features my first menu with a circular icon motion (using a motion guide) as well as a nice analog clock in the middle. The beautiful icons used in this menu are not my own; they are from gakuseisean's iVista icon pack. Many thanks goes to him for giving me permission to include these stellar icons into my menu system. You can visit his website here.
Due to feedback from the SE-NSE forums, I've decided to switch the background to a black colour and must admit it does look better! The menu is available in 3 resolutions:


Labels:
aura flash lite menu
![]() Subscribe to RSS Feed
Subscribe to RSS Feed
For those who are hungry for more SE flash lite menus, peter3334 over at se-nse forums have generously uploaded his collection of over 100 menus in 3 different resolutions. You can take find them here
Cheers.
Labels:
flash lite menus
![]() Subscribe to RSS Feed
Subscribe to RSS Feed
Can I create an array in Flash Lite 1.1?
Unfortunately they are not supported. This has been a common question, as it is definitely an important component in creating icon menus as it drastically simplifies the process. However, what you can do is create a pseudo-array where you name variables using actionscript and a counter, like so:
This will set the variable 'numbers1' equal to one:
eval("numbers1") = 1;
This will set the variable 'numbers2" equal to two:
eval("numbers" add 2) = 2;
If you want to create the range of variables "numbers1" to "numbers9", then you simply do the following:
for(i==1; i<10; i++){
eval("numbers" add i) = i;
}
Here is an application of using this method:
For a typical SE flash menu with icon scrolling, you will have a movieclip that contains each of the 12 icons in each frame. There will be a stop() command on frame 1 to keep it from playing. You will place 5 of the same movieclips on stage, and give them instance names icon0, icon1, icon2, icon3 and icon4. Now, if you want to designate which icon they want to show, you can easily accomplish this through a for loop :
for(/:x=0;/:x<7;/:x++){
tellTarget("icon" add /:x){
gotoAndStop(/:x);
}
I found this method particularly useful in designating and changing icons in flash lite menus.
Labels:
array flash lite 1.1
![]() Subscribe to RSS Feed
Subscribe to RSS Feed
I want to randomly place a symbol somewhere on stage, but I want it to stay anchored around a specific point so it won't wander off the stage. What can I do?
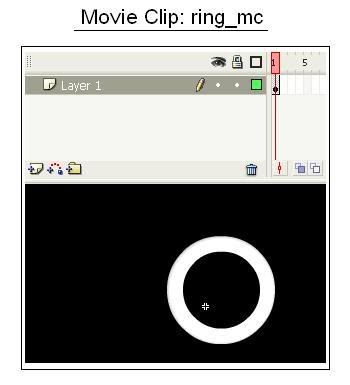
This was previously covered in the Vibrating Objects tutorial. Here are the steps:
1) Create a graphic symbol of the object you want to randomly place
2) Create a movieclip, place the graphic symbol inside. Give the graphic an instance name: we will call ours ball. Extend the movieclip to 2 frames long.
3) In Frame 1 of the movieclip, add actionscript:
/:x_displacement = random(2*/:boundary)-/:boundary;
/:y_displacement = random(2*/:boundary)-/:boundary;
ball._x = /:x_original + (/:x_displacement);
ball._y =/:y_original + (/:y_displacement);
4) Place the movieclip on the stage and place it directly where you want it to be anchored.
5)In frame 1, or whenever the movieclip is beginning, add actionscript in that frame:
/:x_original = getProperty(ball,_x);
/:y_original = getProperty(ball,_y);
6) Determine what x and y displacement you want for randomly placing your graphic. If you decided you want it to displace 5 pixels, then you would add the following line:
/:boundary = 5;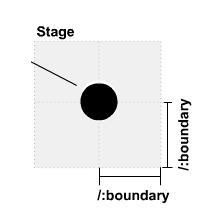
That's it. If you want to control when it will randomly place, and when it will not, obviously you can place a stop() command in frame 1 of the movieclip and tell it to play whenever you want. Also, if you want to displace the graphic in the x and y directions independently, then you can declare a variable called /:boundary_x and /:boundary_y, and then replace the /:boundary variable found in the calculations for /:x_displacement and /:y_displacement.
Labels:
random placement tutorial
![]() Subscribe to RSS Feed
Subscribe to RSS Feed
Is there a way I can create a stopwatch timer in FL 1.1?
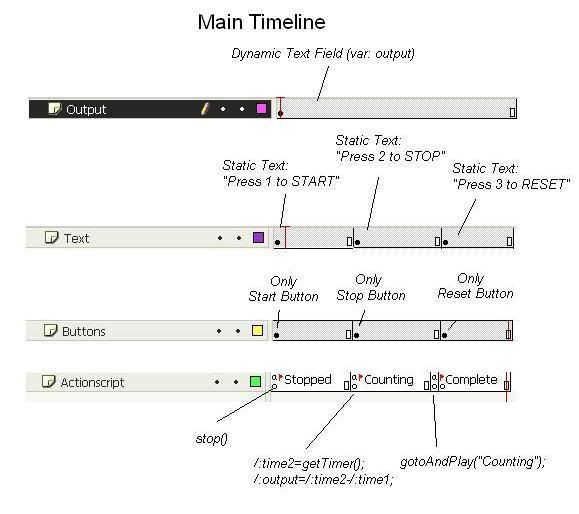
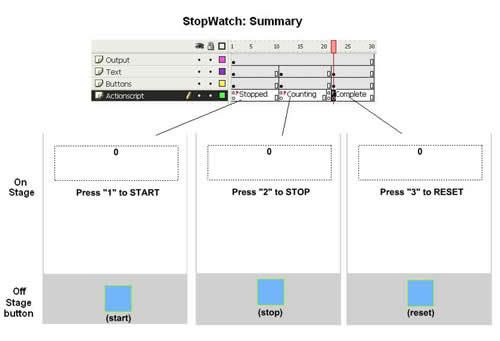
Labels:
stopwatch timer tutorial flash lite
![]() Subscribe to RSS Feed
Subscribe to RSS Feed
Is there an easy way to convert FL 2.0 to FL1.1?
Labels:
convert Flash lite 1.1
![]() Subscribe to RSS Feed
Subscribe to RSS Feed
Here's the latest question from a user:
Do you know any way that I can let that flash lite to choose random colors for a specific symbol?
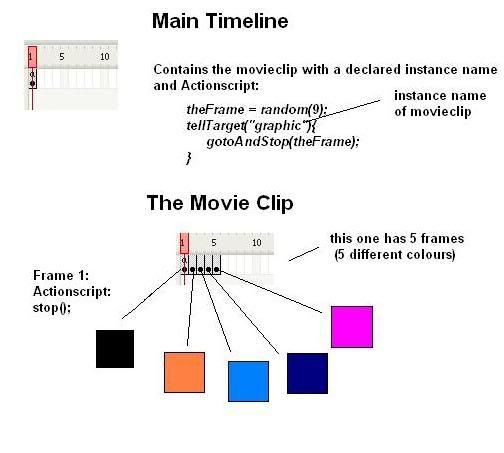
Labels:
random colour flash lite
![]() Subscribe to RSS Feed
Subscribe to RSS Feed
Here's a quick preview for my next FL SE Menu, named Aura. Special thanks to Sean for giving me permission to use his awesome iVista icons in the menu. You can check out his dA site here.
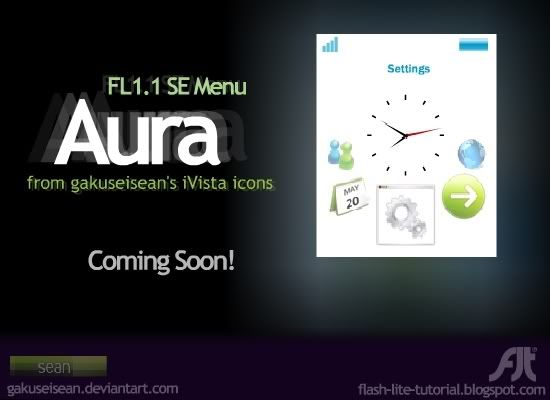
Labels:
Aura SE Menu Flash Lite
![]() Subscribe to RSS Feed
Subscribe to RSS Feed
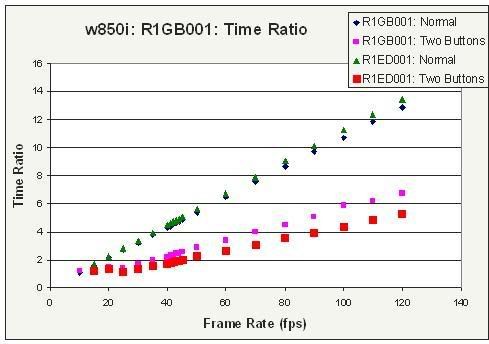
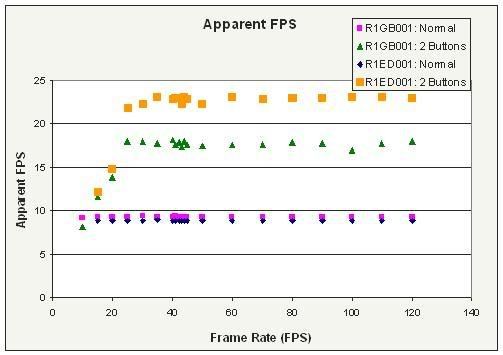
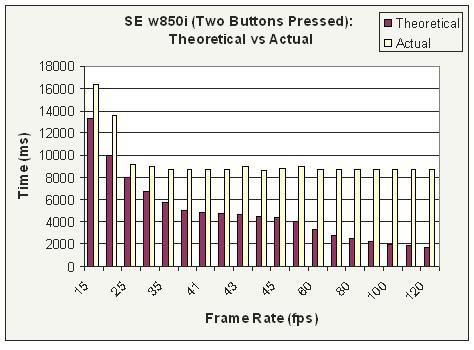
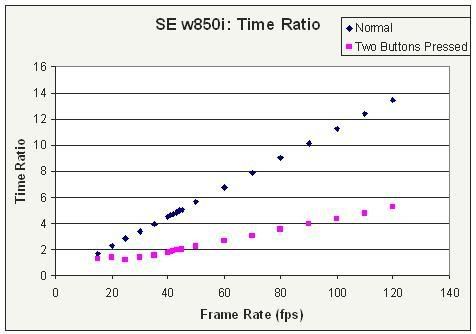
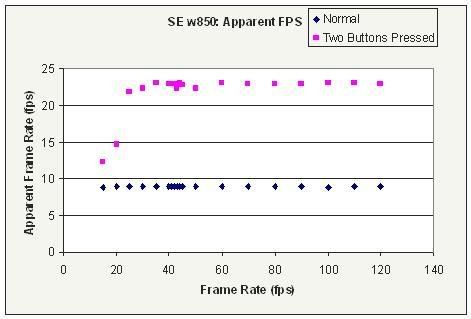
A few days after posting the original w850i frame rate profile with the 2 button phenomena, a w850i user named '20' e-mailed me and was interested in running these tests on his phone. Even better, his phone has a different firmware version on it (R1GB001), and therefore was just what I needed to determine whether the 2 button phenomena was only happening on R1ED001. Thanks to 20, we have some results to display:
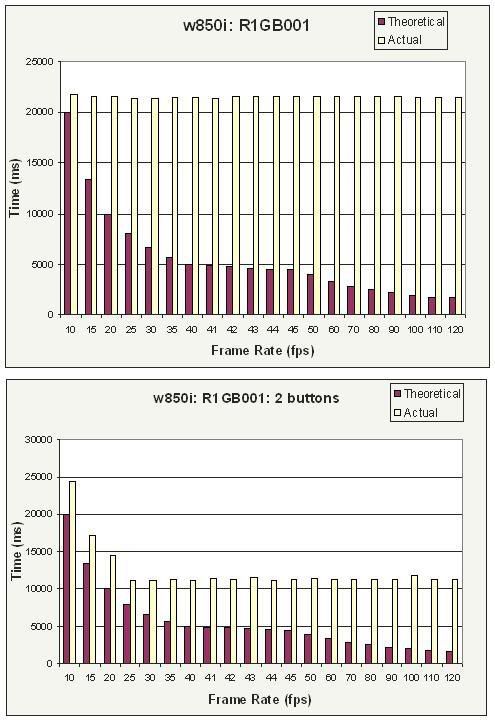
Labels:
SE w850i frame rate profile part 2 R1GB001
![]() Subscribe to RSS Feed
Subscribe to RSS Feed
Some of the new SE phones on the market are beginning to support swfs as standby screens, with the ability to display and react to time, dates and other information retrieved from the phone. Here are the steps to adding a standby menu to a thm file. Credit to lithium3r:
1) Locate your thm file. Open it up and extract into a designated folder using TUGZip.
2) Now, locate your swf standby file. Place it in the same designated folder as above. For simplicity, we will call our file standby.swf.
3) In that designated folder, open up theme.xml. Add this line in the thm file:
<standby_image source="standby.swf"/>
If that line is already present, then just change the file name to whatever the swf is named.
4) Repackage all the contents in the designated folder into a tar file using TUGZip.
5) Rename the .tar file back to .thm.
6) Upload the thm file to your SE phone via file transfer method.
7) Browse to themes and enable that theme.
There you go.
Labels:
standby swf how to SE flash lite
![]() Subscribe to RSS Feed
Subscribe to RSS Feed
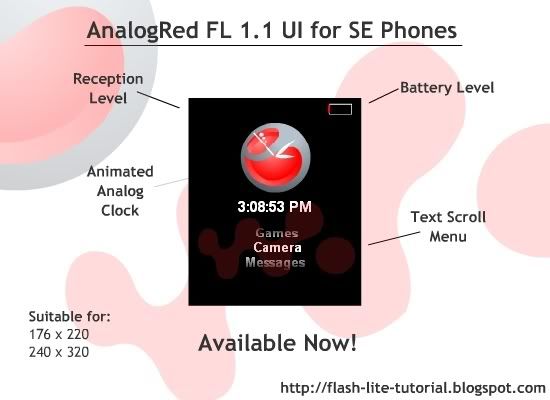
Earlier when I posted my AnalogBlue FL Menu, someone had wanted it in a red theme as well. Here two zip files corresponding to the AnalogRed resolutions (176 x 220 and 240 x 320):
I also quickly made a matching thm file, but it is by no means the best theme for it.
Labels:
analog red flash lite menu
![]() Subscribe to RSS Feed
Subscribe to RSS Feed
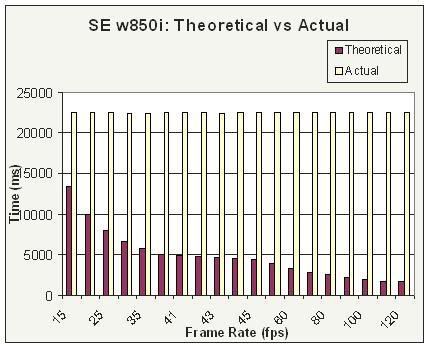
The next phone we have the privilege to look at is the SE 850i. Special thanks goes out to lithium3r for providing the test results and generously using his phone to run the tests. This is the first 240 x 320 SE phone we've taken a look at. For more specifications on this phone, take a look here.

I have one flash lite standby and it runs much faster when it's set to standby than just running it through that browser. So I think that when you press 2 keys down it shows the real speed. I don't know that is this some kind bug in the firmware [R1ED001] because i have the release firmware on my phone [CID49].
Labels:
SE w850i frame rate profile
![]() Subscribe to RSS Feed
Subscribe to RSS Feed
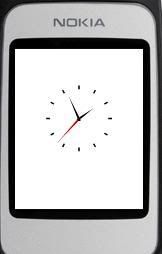
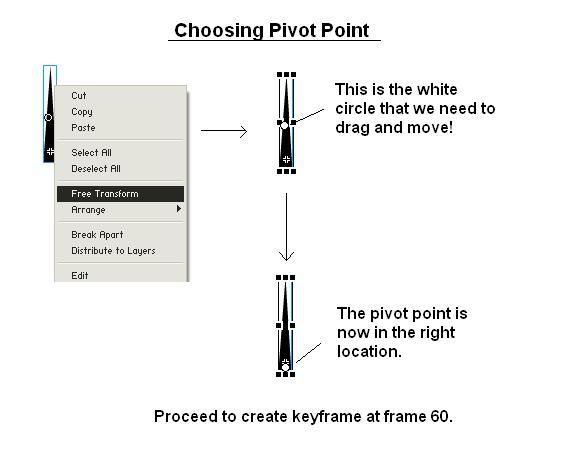
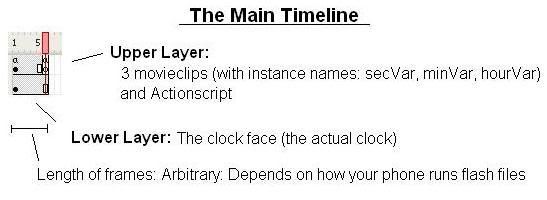
Many of you have asked for me to create a tutorial on how to create your own animated analog clock. In this tutorial, we will go through this process using a couple simple FSCommands.
First off, you will need to create 3 graphic symbols. Each symbol will represent the different hand on the clock. Thus, there will be a minuteHand, secondHand and hourHand graphic symbol (they don't have to be named this way).
Update: Registration does not have to be at the pivot point. Read below for more info.
Next you will need to create 3 movieclips. Each movieclip will house the corresponding graphic symbol undergoing a 360 rotation motion tween. Thus we can name them minuteAnimation, secondAnimation and hourAnimation.

/:seconds=FSCommand2("GetTimeSeconds");The above three lines retrieve the values for the current hour, minute and second. Please note that the hour value is [0,23] format.
/:minWhole=FSCommand2("GetTimeMinutes");
/:hourWhole = FSCommand2("GetTimeHours");
if(/:hourWhole>12){The next following lines compensate for fractions of an hour/minute, since the values returned above are whole numbers. For example, if it is 2:30, you want the hour hand to be between 2 and 3, not just at two:
if(/:hourWhole>11){
/:ampm = "PM";
}
/:hourWhole=/:hourWhole-12;
}else{
if(/:hourWhole==0){
/:hourWhole+=12;
}
/:ampm = "AM";
}
/:hourFraction = (/:mins / 60)*5;We multiply by 5 to yield a number between 1 and 60 (we will see why later).
/:minFraction = /:seconds/60;
/:mins = int(/:minFraction + /:minWhole);
/:hours = int((/:hourWhole*5)+ /:hourFraction);
tellTarget("secVar"){
gotoAndStop(/:seconds+1);
}
tellTarget("minVar"){
gotoAndStop(/:mins+1);
}
tellTarget("hourVar"){
gotoAndStop(/:hours+1);
}
Labels:
analog clock tutorial flash lite
![]() Subscribe to RSS Feed
Subscribe to RSS Feed
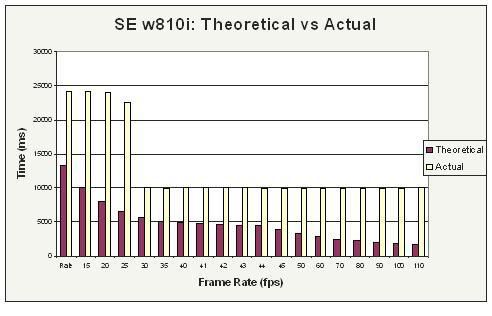
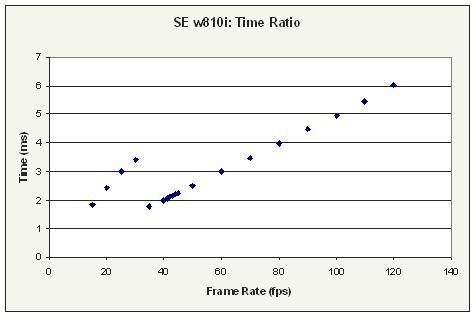
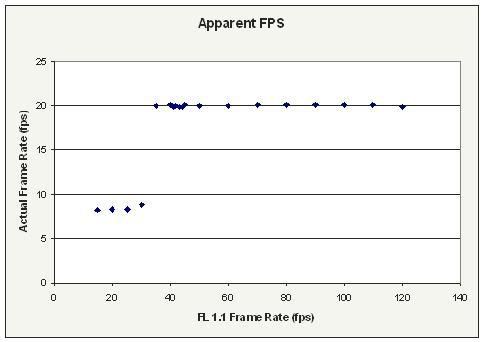
The next phone we have decided to look at for our frame rate profile is the SE w810i, a very successful and popular phone on the market that is FL1.1 enabled. You can take a look at the specifications here

Labels:
w810i frame rate profile
![]() Subscribe to RSS Feed
Subscribe to RSS Feed