Monday 30 April 2007

Nokia 6131 Frame Rate Profile


We continue our frame rate profiles with the Nokia 6131. This is the first time we've looked at frame rates for a Nokia phone, the others have been for Sony Ericsson's w300i and w550i. Thanks to vivek at i2fly, he has provided us with some valuable information on the frame rate profile.


The same test (rotating circle) is repeated except at different frame rates. The resulting time to complete the animation is recorded, compared to the theoretical time it should be completed (based on frame rate) and the time ratio is then computed. Here are the results. Click to zoom in:


As you can see from the results, it is essentially a linear function; as frame rate increases, the time ratio also increases. Thus, there is no 'optimal' frame rate to set your animation at, but keep in mind that it is pointless to have the animation at a ridiculously high frame rate when the eye can tell the difference. Higher frame rates will eat up processing power, so it's important to maintain a balance.

In comparison, we saw from the SE w300i/550i profiles, there was a big dip in time ratio at around 45 fps which doesn't seem to be present in this phone. I'd really like to test out other SE or Nokia phones and see what they're like. If you're interested, send me an email at phirewerkz [at] gmail [dot] com.

Tuesday 24 April 2007

Vibrating Objects Tutorial (FL1.1)


In the previous Vibrate! tutorial, we had a taste of how you can make your phone vibrate after specific triggers (button presses). Wouldn't it be nice if you could get the objects on your stage to vibrate when your phone actually vibrates? It would provide a nice effect indeed! We'll take a look into how this can be done.


Start off with a new flash file. In frame 1, we will put in some actionscript in frame 1 _root that will define some parameters that we will use.

The proceeding two lines gather the information about the original position of the object (the instance name is 'ball') before it begins to vibrate. Although vibration displacement is random, it is NO guarantee that it will remain centered around where you want it to be. Thus, we need to use this variable as an anchor for calculating displacement:
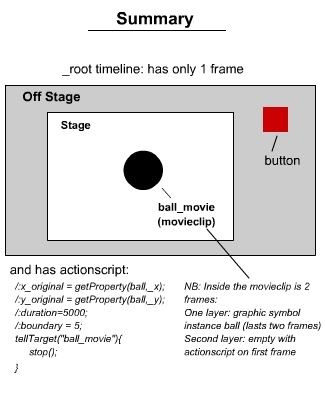
/:x_original = getProperty(ball,_x);
/:y_original = getProperty(ball,_y);

Duration refers to the amount of time you want the object and the actual cellphone to vibrate, and is in milliseconds:

/:duration=5000;

Boundary refers to the amount of displacement you want to achieve when your object vibrates, and it is in pixels. For simplicity, we use this as a general variable for both x and y displacements. If you want to have specific boundaries for x and y, you would have to change up the code a bit:
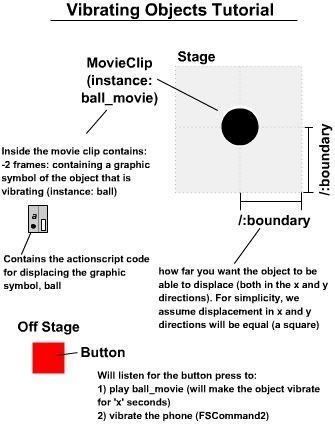
/:boundary = 5;


Our movie clip contains a graphic symbol as well as actionscript that will cause it to displace and 'vibrate'. However, we want to be able to control this on command. Thus, when the trigger has not been pressed yet (ie when the file is just loaded), you don't want the object to vibrate just yet:

tellTarget("ball_movie"){
stop();
}

The symbols you will need:

1) Graphic (the object you want to vibrate)
You will need to create an object that will be the thing that vibrates on command.

2) Movie Clip
Create a movieclip. Inside this movieclip, place the graphic symbol (from 1) you had produced, and give it an instance name. We will call it 'ball'. The movie clip will actually be creating the vibrating. The movieclip will be 2 frames long. The following lines of code will be needed to be present in frame 1 :

The proceeding two lines calculates the displacement in the x and y directions based on the /:boundary variable we had set earlier on in frame 1 of _root timeline. Because we want it to be able to move both in the -x and +x directions, we multiply by 2 and subtract by the same variable. Thus, if we choose the boundary to be 10, it will return a value between -10 and 10.

/:x_displacement = random(2*/:boundary)-/:boundary;
/:y_displacement = random(2*/:boundary)-/:boundary;

Now since we have the graphic instance 'ball' inside out movie clip, we simply call to it and change its x and y coordinates.

ball._x = /:x_original + (/:x_displacement);
ball._y =/:y_original + (/:y_displacement);

Now, as we mentioned earlier, this movieclip will not spontanesouly play until it is called upon right? And when it does, it will do so only for a specific period of time. Thus we need to be able to keep an on-going check if whether or not the duration time is up.

This will calculate when the end time of the movieclip should be. When we get to the code inside the button, you will understand where startTime comes from. Remember, /:duration was defined in _root timeline:

/:endTime = /:startTime+/:duration;

This is a simple check that calls up getTimer() and sees if it is past the time we calculated, and if so, stop the animation. getTimer() is a function that returns the time that has elapsed since the flash file was opened, which is perfect for this project:

if(getTimer()>/:endTime){
stop();
}

3) Button
This (onwards of FL1.1) will act as the listener for the trigger that will cause the phone to vibrate and the object on screen to vibrate as well. You don't need to put too much time on this, just make a box or something. It will be placed off stage so you won't see it anyways.

Right click on the button, select Actions. We will put in some code to finish this project:

on(keyPress ""){
/:startTime = getTimer();
tellTarget("ball_movie"){
play();
}
checka = FSCommand2("StartVibrate",/:duration,0,1);
}

We are using the Enter button as the trigger to start the animation. /:startTime variable is defined here since the endTime variable should only be defined upon pressing of the trigger. At the same time, it tells the movieclip to begin playing. Once it starts playing, it will begin comparing the current time with the endTime to determine when to stop. Perfect. Lastly, we put in the FSCommand2 for the vibrate, substituting in /:duration so that it is sync with our animation. The checka variable is not required, but it's a good indicator if your vibration is not working: if it returns -1, the function is not supported, 0 means no errors, 1 means error with the phone, and did not vibrate.


So there you have it! I hope this tutorial was informative and adds to your toolbox of cool effects to use for your applications. But remember of the frame rate limitions and processing limitations that your phone may have. Questions? Comments? phirewerkz [at] gmail [dot] com

Sunday 22 April 2007

Using Device Fonts


After working on a few projects that had moving text, I decided to try it out on the ol w300i. Lo and behold, the frame rate is brutal and there's no way anyone would want a choppy animation when they're choosing items in a menu. So, I decided select "Use device fonts" in the properties of the textbox.


After doing this, I am happy to say that the animation runs much smoother and actually matches the phone better! So word of advice, if you plan on animating text for any reason (*cough menu selection), it's a good idea to switch to device fonts!

Thursday 19 April 2007

Battery Level and Reception Signal Tutorial


As per request from lithium3r, I've decided to write a short tutorial on how to create battery and signal gauges for flash lite applications. It is especially useful for those deciding to create flash lite menus, as that's one of the things you will usually see on them. We will take a look at creating a very simple battery gauge first.

*NOTE: The FSCommand2 functions shown in this tutorial only work on phones that support the function. Please refer to this for some info on Nokia phones.

Battery Gauge:

The two important commands used to retrieve battery level status are as follows:

status = FSCommand2( "GetBatteryLevel" );
status = FSCommand2( "GetMaxBatteryLevel" );

One function receives the current battery level while the latter retrieves the maximum level (in a numerical form of course). If your phone does not support this function (as in the case of the FL1.1 emulator), it will send back -1.


So what now? With these two values, you're pretty much creating a preloader to a flash movie essentially. First off, you need a movieclip that consists of the bar, with the crosshair being at the left most side of the bar.


Then we proceed with the following two lines which you've seen:


/:currentBattery = FSCommand2( "GetBatteryLevel" );

/:maxBattery = FSCommand2( "GetMaxBatteryLevel" );


Now we'll calculate the fraction that will allow us to adjust the width of our bar accordingly:

/:battFraction = /:currentBattery / /:maxBattery;

This line is just formatting the fraction into percentage form in case you want to display it. In this case, you can create a dynamic textfield with var=battLevel to display the battery in percent form.

/:battLevel = Math.round(/:battFraction*100) add "%";

I've used Math.round() function here, but it seems as though it is not supported in some phones, so a better alternative may be using (int) truncation:

/:battLevel = ((int)(/:battFraction*100)) add "%";

Now we need to decide what the maximum width of the original bar is in order to scale it properly. In this case, I have called the instance to my movieclip 'batt':

/:maxWidth = batt._width;

Using the fraction calculated, multiply it with the maximum width to resolve the current width you will display:

/:currentWidth= /:battFraction * /:maxWidth;

Now we just set the width of the movieclip (batt) to its preferred width using the _xscale command.
**NOTE: batt._width or batt.width are READ ONLY functions in FL1.1:

batt._xscale=/:currentWidth;

There you have it, once you've done this you can take it for a test run. Beware, the FL1.1 emulator will not be able to return battery levels to you, so you will need to test with a real phone! However, I'd recommend predefining values for battFraction just to test out the code to make sure it works.

Reception Signal:
Surprising as it may seem, the two functions responsible to retrieve reception is very similar to what we've seen before:

status= FSCommand2( "GetSignalLevel" );
status= FSCommand2( "GetMaxSignalLevel" );

Like before, we can combine these two values to form a fraction, and then use it to change the width of a bar like the battery. However, from my experience of, reception signals are usually expressed in vertical bars of increasing height, so we will try to recreate this effect.

First off, lets talk about the vertical bars. You will need to decide how many bars in total you want to have. For simplicity sakes, I went with 5. Consequently, I will need 6 frames in my movie clip, one to show each state PLUS one frame for no bars (no reception):


You will need the stop() function on frame one, so that when the movie is placed on stage, it will not zoom through all the frames. Now we need to relate the frame number to the fraction of full signalling. Using this method where each frame increments in bars, we can do the following:

/:currentSig = FSCommand2( "GetSignalLevel" );
/:maxSig = FSCommand2( "GetMaxSignalLevel" );

Now we calculate the fraction of full signal achieved.

/:sigFraction = /:currentSig / /:maxSig;

To calculate the theoretical number of bars we should have, we multiply the fraction calculated by the number of bars we had in our movie clip, which is 5. We perform Math.round because you can not display 3.48 bars, and thus we need to have a rounded number. Again, you can change Math.round() to int() instead, which will hopefully solve any compatiblity issues.

/:numBars = Math.round(/:sigFraction * 5);

This line is extra and used to format the percentage so that it can be displayed in a dynamic text box with var = receptionLevel:

/:receptionLevel = Math.round(/:sigFraction*100) add "%";


Now we call upon the instance of the movie clip that contains the 6 frames (of the bars). I called the instance 'reception'. We tell it to go to the rounded number of bars we calculated. Since frame numbers start at 1, we need to add on 1 to the variable. Recall that frame 1 = no bars, but /:numBars= 0 when there is no reception.

tellTarget("reception"){
gotoAndStop(/:numBars+1);
}

Once again, the emulator will not be able to provide values for the signal, so you will have to test using predefined variables. I hope this little tutorial has provided some insight on how this is done, I present you with a sample screenshot of the finished product:


Tuesday 17 April 2007

Analog Clock Menu - Preview


Been working on a new flash lite menu for SE phones. The major feature I'm implementing for this one is a full animated analog clock. I'm still deciding how the menu is going to work, but that shouldn't be too hard. Thanks to vivek for the preview:


Stay tuned for more. I'll probably be posting a tutorial for this analog clock feature soon as well. Got ideas? phirewerkz[at]gmail[dot]com

Saturday 14 April 2007

Elements Icon Suite Flash Lite Menu (w300i, FL1.1)


I've been real busy lately, not a lot of time to work on this stuff. Anyways, I've finished up the Flash Lite Menu : Elements Icon Suite (uses Flash Lite 1.1, so should work on as many phones). This is a completely original flash lite menu that uses icons from the ever so popular Elements Icon Suite (http://pantoni.deviantart.com). Here's a quick preview:


The menu is a slide scroller; don't mind the weird names in the title, that's referring to variable names. I didn't place much effort into the actual theme, so it's not as fancy. Note, that this menu is designed for the w300i resolution (128 x 160). Thus, any larger resolutions may stretch the bitmaps used.

Link:
http://rapidshare.com/files/26025729/ElementsIconSuite.rar.html
or
http://www.mediafire.com/?52zjxgnqiom


The rar file contains the swf, thm and a readme.txt file. Follow the steps on my previous guides to get them operable on your phone.


Feel free to comment on this. If you decide to take apart my menu and edit it, I would appreciate if you would let me know beforehand.