Friday 29 June 2007

Aura SE FL Menu (1.1, Various)


I'm happy to announce that the latest flash lite menu is available for download. This new menu, called 'Aura' features my first menu with a circular icon motion (using a motion guide) as well as a nice analog clock in the middle. The beautiful icons used in this menu are not my own; they are from gakuseisean's iVista icon pack. Many thanks goes to him for giving me permission to include these stellar icons into my menu system. You can visit his website here.

Due to feedback from the SE-NSE forums, I've decided to switch the background to a black colour and must admit it does look better! The menu is available in 3 resolutions:


The zip file contains the thm file (it is very basic), readme and swf file.


Links:
128 x 160
176 x 220
240 x 320

I'd love to hear your comments and any suggestions for upcoming menus. Thanks again for everyone's support!

Monday 25 June 2007

More SE Flash Lite Menus


For those who are hungry for more SE flash lite menus, peter3334 over at se-nse forums have generously uploaded his collection of over 100 menus in 3 different resolutions. You can take find them here

Cheers.

Wednesday 20 June 2007

Using Arrays? (FL1.1)


Can I create an array in Flash Lite 1.1?

Unfortunately they are not supported. This has been a common question, as it is definitely an important component in creating icon menus as it drastically simplifies the process. However, what you can do is create a pseudo-array where you name variables using actionscript and a counter, like so:

This will set the variable 'numbers1' equal to one:
eval("numbers1") = 1;

This will set the variable 'numbers2" equal to two:
eval("numbers" add 2) = 2;

If you want to create the range of variables "numbers1" to "numbers9", then you simply do the following:

for(i==1; i<10; i++){
eval("numbers" add i) = i;
}

Here is an application of using this method:

For a typical SE flash menu with icon scrolling, you will have a movieclip that contains each of the 12 icons in each frame. There will be a stop() command on frame 1 to keep it from playing. You will place 5 of the same movieclips on stage, and give them instance names icon0, icon1, icon2, icon3 and icon4. Now, if you want to designate which icon they want to show, you can easily accomplish this through a for loop :

for(/:x=0;/:x<7;/:x++){
tellTarget("icon" add /:x){
gotoAndStop(/:x);
}

I found this method particularly useful in designating and changing icons in flash lite menus.

Tuesday 19 June 2007

Anchoring Random Placement


I want to randomly place a symbol somewhere on stage, but I want it to stay anchored around a specific point so it won't wander off the stage. What can I do?

This was previously covered in the Vibrating Objects tutorial. Here are the steps:

1) Create a graphic symbol of the object you want to randomly place
2) Create a movieclip, place the graphic symbol inside. Give the graphic an instance name: we will call ours ball. Extend the movieclip to 2 frames long.
3) In Frame 1 of the movieclip, add actionscript:

/:x_displacement = random(2*/:boundary)-/:boundary;
/:y_displacement = random(2*/:boundary)-/:boundary;
ball._x = /:x_original + (/:x_displacement);
ball._y =/:y_original + (/:y_displacement);

4) Place the movieclip on the stage and place it directly where you want it to be anchored.
5)In frame 1, or whenever the movieclip is beginning, add actionscript in that frame:

/:x_original = getProperty(ball,_x);
/:y_original = getProperty(ball,_y);

6) Determine what x and y displacement you want for randomly placing your graphic. If you decided you want it to displace 5 pixels, then you would add the following line:

/:boundary = 5;


That's it. If you want to control when it will randomly place, and when it will not, obviously you can place a stop() command in frame 1 of the movieclip and tell it to play whenever you want. Also, if you want to displace the graphic in the x and y directions independently, then you can declare a variable called /:boundary_x and /:boundary_y, and then replace the /:boundary variable found in the calculations for /:x_displacement and /:y_displacement.

Sunday 17 June 2007

Creating a Stopwatch Timer


Is there a way I can create a stopwatch timer in FL 1.1?

Yes, this can be done. The main function you can use is getTimer():

time1=getTimer();

This will return the time (in milliseconds) which has elapsed since the flash lite file has been loaded. In a typical stop watch, you will have a start, stop and reset button. We will create 3 button symbols representing each button and will act as button listeners.

First off, let's discuss the algorithm. Since we are trying to emulate a real stopwatch, there are a couple things we need to achieve:

1) Only ONE button should be pressable at each specific state. For example, if the stopwatch is ready to start counting, pressing STOP or RESET will not do anything. Likewise, while the stopwatch is counting, START and RESET will not do anything.
2) There should be an actively incrementing counter when START button has been pressed.
3) There should be some instructions on screen.

Let's begin. Create 3 buttons (one for START, STOP and RESET). Also create 4 layers.
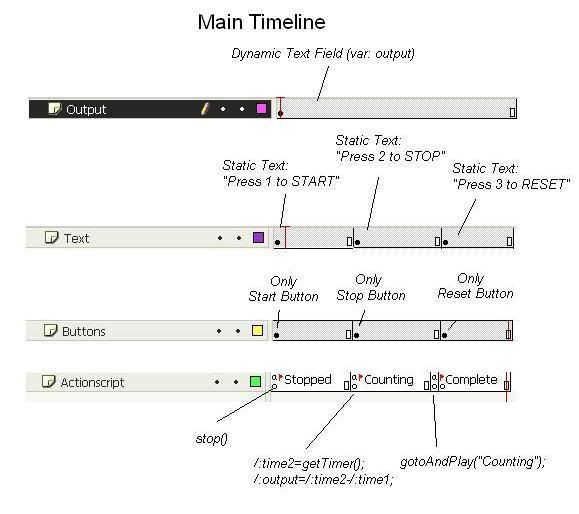
Set up the main timeline as follows. I have exaggerated the frame lengths for easier understanding:


Here you can see I've divided the main timeline into 3 distinct portions with labelled frames. "Static Text" means placing normal text on stage. "Only Stop Button" refers to the fact that in that duration of frames, only the STOP button will be on the stage, and not the START nor RESET buttons. There is also a layer that contains actionscript which has been written out for you. In the layer named Output, you will create a dynamic text field on stage, and set the var property to 'output'.

The last thing we need to do is add some actionscript to the buttons. So, drag the button onto the stage in the appropriate phase (ie - drag the START button in the Stopped phase, etc.), right click the button and select Actions...

For the Start Button: We will execute the code when the keypad 1 button is pressed. You can change it to whatever you like:

on(keyPress "1"){
/:time1=getTimer();
gotoAndPlay("Counting");
}

For the Stop Button: We will execute the code when the keypad 2 button is pressed. You can change it to whatever you like. By subtracting the difference, we now have the elapsed time from when button 1 was pressed until button 2 was pressed. You can then format the code for display purposes:

on(keyPress "2"){
gotoAndStop("Complete");
/:time2=getTimer();
/:duration = /:time2 - /:time1;
/:output = "Elapsed Time: " add /:duration;
}

Please note that the information being held in the variable /:output will directly be displayed in the dynamic text field we talked about earlier.

For the Reset Button: We will execute the code when the keypad 3 button is pressed. You can change it to whatever you like.

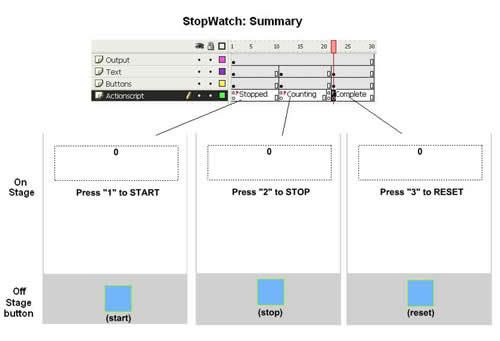
on(keyPress "3"){
/:output="0";
gotoAndPlay("Stopped");
}

There you have it. Here is a recap:


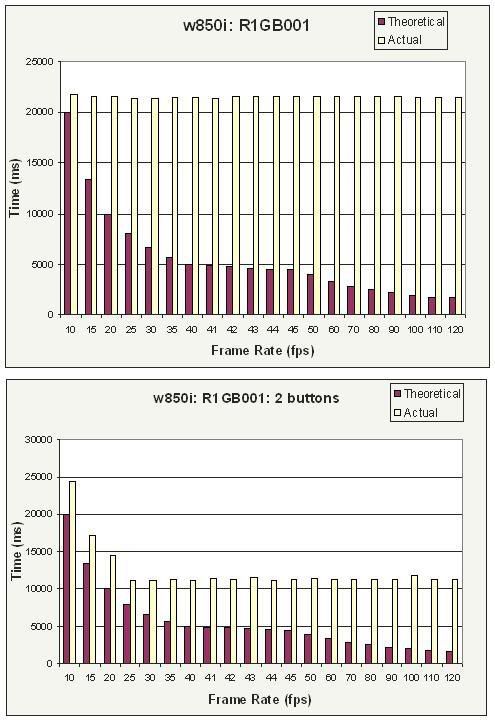
One important thing to realize is that this stopwatch won't increment as smoothly as a real timer. That is to say, the display will jump from 0, 15, 23, ... instead of 0,1,2,3,.... The frame duration of the "Counting" phase will determine the duration between updating the display. So a shorter frame length will result in a smoother increment display.

Saturday 16 June 2007

Converting SE Flash Menus from FL2.0 to FL1.1


Is there an easy way to convert FL 2.0 to FL1.1?

Alot of the new SE phones coming on the market are starting to support FL2.0, which gives developers greater flexibility and power in creating flash lite applications. Consequently, a lot of the new menus coming out are being exclusively for FL2.0 enabled phones.

Based on my knowledge, there is no easy way to convert it. If you have the original FL2.0 fla file, you would have to go in and manually change the actionscript code so that it is FL1.1 compatible. While in some cases it may be very easy (like variable names minutesDisplay to /:minutesDisplay), some require more research and some are straight out impossible.

Many FL2.0 functions are not supported in FL1.1. One big loss in FL1.1 is the inability to create dynamic tweens. Thus, converting to FL 1.1 would require 'hardcoding' a motion tween. An example would be the analog clock. In FL2.0, you can dynamically rotate the symbols using AS, whereas in FL1.1 you would have to pre-create the 360 rotating motion tween.

Thus, the algorithm to create an application in FL2.0 may not necessarily be the same as in FL1.1 This means that one would have to re-design the application which could require a lot work. In terms of SE flash lite menus here are some things you would need to keep in mind when trying to convert:

1) Variable designations (var1 in FL2.0 would need to changed to /:var1 if accessed globally)
2) Phone accessing function (FL2.0 uses FLCmd(), FL1.1 uses FSCommand, FSCommand2)
3) Unsupported functions (hardcoding the motion tween, using other functions, etc.)
4) Button Listeners (FL2.0 uses button listeners, whereas FL1.1 uses on(keyPress))

If you feel I've missed any important functions that pertain to SE FL menus, feel free to buzz me.

Sunday 10 June 2007

Randomizing Colours


Here's the latest question from a user:

Do you know any way that I can let that flash lite to choose random colors for a specific symbol?

Unfortunately in FL 1.1, it DOES NOT support the setRGB() function. This function (supported in FL2.0 and later) allows you to set the hexidecimal colour designation for symbols.

A work around to this problem is available though. However, it really defeats the concept of a completely random selection. What you can do is, create graphics and save them as movieclip symbols. Each movieclip contains several frames of the same graphic but in different colours. This can be achieved by manually changing colours, or even better, you can change the color properties of the symbol (Color -> Advanced). In that window, you can manually change RGB and Alpha values to your liking.

Then at frame 1, set the actionscript stop();. Once the frame is placed on the main timeline and given an instance name, you can then use a random number generator to create a random number between 0 and x, where x is the number of frames-1. Then use the gotoAndStop() function to designate the frame number:

The number in brackets sets the maximum number which will be outputted. So if you have ten frames in said movieclip, choose 9, because the numbers outputted are 0-9 inclusive.

theFrame = random(9);

Then we follow with a command to change the frame number of that movieclip (with instance name 'graphic') to that randomized number. We add 1 because frame 0 does not exist.

tellTarget("graphic"){
gotoAndStop(theFrame+1);
}


Though the random-ness of this method really depends on how many different frames you want, it is kind of nice, as it lets you determine which colours you want displayed specifically.

Hope this helps.

Preview: Aura FL SE Menu


Here's a quick preview for my next FL SE Menu, named Aura. Special thanks to Sean for giving me permission to use his awesome iVista icons in the menu. You can check out his dA site here.


Monday 4 June 2007

w850i: FRP: Part 2: R1GB001


A few days after posting the original w850i frame rate profile with the 2 button phenomena, a w850i user named '20' e-mailed me and was interested in running these tests on his phone. Even better, his phone has a different firmware version on it (R1GB001), and therefore was just what I needed to determine whether the 2 button phenomena was only happening on R1ED001. Thanks to 20, we have some results to display:


The above graphs have identical results as the original firmware (R1ED001). The normal mode shows times indifferent to frame rates (-23fps), while pressing 2 buttons increases performance significantly.

Using the data obtained from Part 1, we have plotted the time ratios of the old firmware R1ED001 (Normal, 2 Buttons) on the same graph as the new firmware R1GB001 (Normal, 2 Buttons).


As you can see, the time ratios are comparable to eachother, both having increased performance when 2 buttons pressed. Finally, here is the apparent fps plot:


It seems like the 2 button performance increase is more evident in the older firmware than the newer one. Either way, pressing down 2 buttons still shows an increase in flash lite movie performance.

So from these graphs, we have evidence that 2 SE w850i firmwares (R1ED001, R1GB001) both show a marked increase in swf performance when two buttons are pressed. I will be contacting SE shortly to see what their input on this is.

Friday 1 June 2007

How to: Incorporate Standby SWF into THM files


Some of the new SE phones on the market are beginning to support swfs as standby screens, with the ability to display and react to time, dates and other information retrieved from the phone. Here are the steps to adding a standby menu to a thm file. Credit to lithium3r:

1) Locate your thm file. Open it up and extract into a designated folder using TUGZip.

2) Now, locate your swf standby file. Place it in the same designated folder as above. For simplicity, we will call our file standby.swf.

3) In that designated folder, open up theme.xml. Add this line in the thm file:

<standby_image source="standby.swf"/>

If that line is already present, then just change the file name to whatever the swf is named.

4) Repackage all the contents in the designated folder into a tar file using TUGZip.

5) Rename the .tar file back to .thm.

6) Upload the thm file to your SE phone via file transfer method.

7) Browse to themes and enable that theme.

There you go.