Random Ripple Tutorial
Lots of the new flash wallpapers out there feature cool randomized aesthetics which make it look really nice. In this tutorial, we will create a randomized ripple like effect using Flash Lite 1.1. I'm taking a simplifed approach to this and is fairly simple to understand.
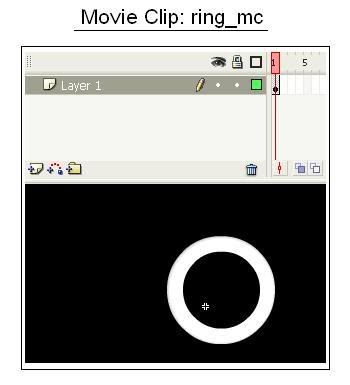
This can be achieved with two symbols. First, create a movie clip symbol called ring_mc. Inside this symbol, create a simple ring shape like so:
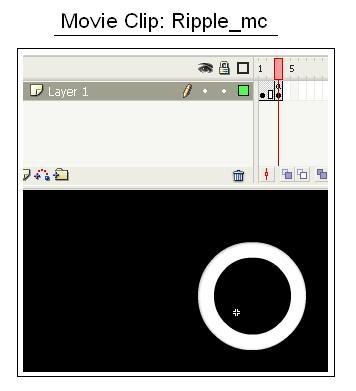
Next, create a movie clip called ripple_mc. Inside this movieclip, place ring_mc symbol inside frame 1. Give the placed ring_mc an instance name, called 'ring'. Extend the frame duration to 4 frames. At frame number 4, add a keyframe and add the following script: I have made comments to show you what it does:
//increase the size of the instance ring
ring._xscale+=5;
ring._yscale+=5;
//make the instance more transparent
ring._alpha-=10;
//after the instance expands to a certain degree, remove the symbol from stage
if(ring._width>150){
removeMovieClip(_root._name);
}
From the above code, you can see that the increased size and decreased alpha will give it a ripple effect as the movie continues to loop. The last couple of lines above are more to conserve memory: we don't want all these symbols to accumulate on stage when we randomly place them.
Now, switch to the main timeline. Let's take this frame by frame:
Frame 1: Add Keyframe
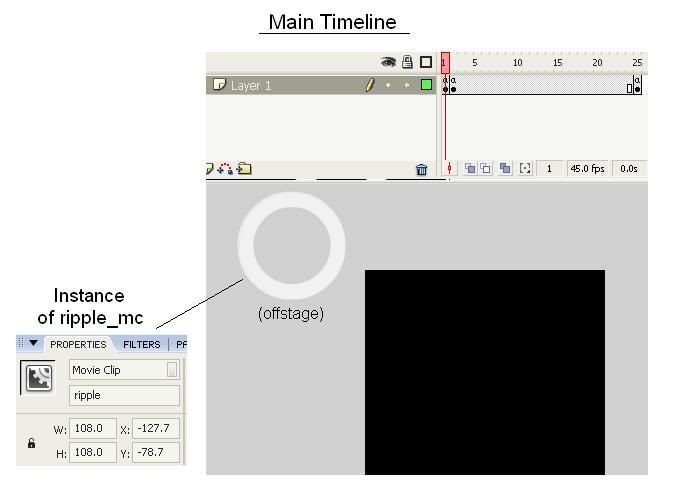
Place the ripple_mc symbol onto the main area, but off-stage (not in the visible area). Give it an instance name of 'ripple'. Also add the following actionscript:
/:counter = 1;
This counter serves dual purpose. It helps create a pseudo array of movieclips and also designates which layer the movieclip will be placed!
Now, add a keyframe at Frame 2: In frame 2, add the actionscript:
//these two lines generates a random number: since we want to randomly place a movieclip in X and Y directions, we need two random numbers*/
//the numbers in the parentheses depend on your screen resolution (here it is 240 x 320)
/:randomX=random(240);
/:randomY=random(320);
//here we generate a random size for the rippled to be scaled to
//we add 30 so that they are not too small
/:randomSize=random(120)+30;
//this is the most important line: it duplicates the instance we placed on stage (ripple) and gives it a name (ripple1, ripple2, ripple3 etc) based on the counter. The last parameter is the layer which each movieclip will be placed on (1,2,3,..). Only one movieclip can exist on each layer, so that is why we increment everytime a new movie is instantiated
duplicateMovieClip("ripple", "ripple" add /:counter, /:counter);
//these four lines scale and place the created movieclip onto the stage
eval("ripple" add /:counter)._xscale= /:randomSize;
eval("ripple" add /:counter)._yscale= /:randomSize;
eval("ripple" add /:counter)._x= /:randomX;
eval("ripple" add /:counter)._y= /:randomY;
//we need to increment the counter so that when this code is executed again, a new movieclip with a new instance name will be created
/:counter++;
//since we know that it is unrealisitc to have 10 ripples on stage at once, we can loop the counter to save on memory and to reuse some layers
if(/:counter>10){
/:counter-=10;
}
Recall back in the ripple_mc we had an if statement to check on the size. This is to 'double check' on the ripple size: if it's too big we will remove it to save memory.
Now, add a keyframe at frame 25 and add the line:
//this will loop the movie
gotoAndPlay(2);
There you have it! Remember that this is just a tutorial, and a lot of things can be modified to fit your needs. Such as :
1) How much you want to increment the _xscale, _yscale and _alpha
2) The frame duration of ripple_mc (how often the ripple expands)
3) The frame duration between frames 2 and 25 (how often a new ripple appears)
4) Frame Rate!
Here is the final product:
![]()
Labels:
random ripple tutorial
![]() Subscribe to RSS Feed
Subscribe to RSS Feed


4 comments:
Excellent tutorial! I happened to be looking for just this over the past few days! You rock man! And I've read a lot of your other stuff too, and you're a real good guy, even if someone is a jerk to you, and I respect that.
Thanks for your kind words. It's great to hear that my tutorials are really helping others =)
Hi, just wanted to thank you for this. The insertion of code in the last frame of a movie clip was new to me... :D
Very good info. I am new to flash lite, and would like to know if there is a way of creating all the code in your tutorials (for flash lite 1.1) with the command line, instead of an IDE. Could you please point me somewhere to start with this.
Thank you
Post a Comment