Dynamic Wallpaper Tutorial: Sunrise, Sunset
Hey guys - it's been a while since I've posted a tutorial. I've been terribly busy with my school studies, that I barely have time for myself, let alone write a tutorial. But now that I am done exams and the holiday season is upon us, here is my gift for fellow readers out there. I hope you enjoy it!
Dynamic Wallpaper: Part 1: Sunrise, Sunset
With the onset of new SE phones being able to support standby swfs, we see a growing number of standby swfs that are animated in such a way that they change according to the time of day. Wouldn't it be nice to see an evening landscape when it's dark out and a bright meadow during the afternoon? Let's see how this is done!
Above is an swf example of the 'animation' we are aiming for. Obviously, the background should only change as time progresses, but I just wanted to give you an idea of what the end product would be like in summation.
The trickiest part of this project is creating the effects that corresponding to sunrise and sunset; the actionscript is incredibly simple and you have probably seen it already. In this tutorial we are aiming for mountain scape, where the dynamic components are the sun, moon and sky colour.
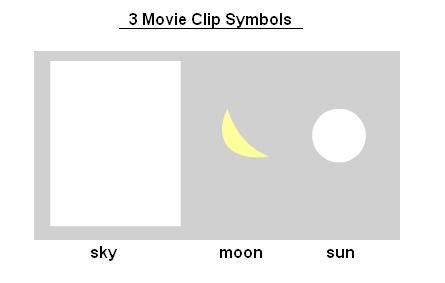
Therefore, we first need to create 3 graphic symbols that correspond to the sun moon and sky. Since we will need to change the colour of these symbols using the Color properties, we will create these symbols with a white fill. When creating your graphics, try to center them onto the crosshair using the Align tool. That way, it will be easier to select the appropriate colour tween. The sky will just be a white rectangle, the sun a circle, and the moon a will be a yellow crescent. Because I felt the moon is generally a static colour, I decided to keep it one colour. The others may change colours, so I felt it would be easier to keep them white and apply a tint later:
Next, we create a new movieclip that will house the entire 24 hour animation. The easiest way to create this animation is to have the frame length set at 24 frames, but I feel that it would be pretty choppy, so in this tutorial, we are creating a 48 frame animation. The frame numbers will correspond to:
Frame 1 (Midnight)
Frame 20 (10:00 am)
Frame 30 (3 pm)
Frame 48 (11:59pm)
We will need 4 layers:
TOP
1) Foreground (we will use a mountain scape)
Motion Guide (todirect the motion tween of sun and moon)
2) Sun (will contain the sun animation)
3) Moon (will contain the moon animiation)
4) Background (this will contain the sky)
BOTTOM
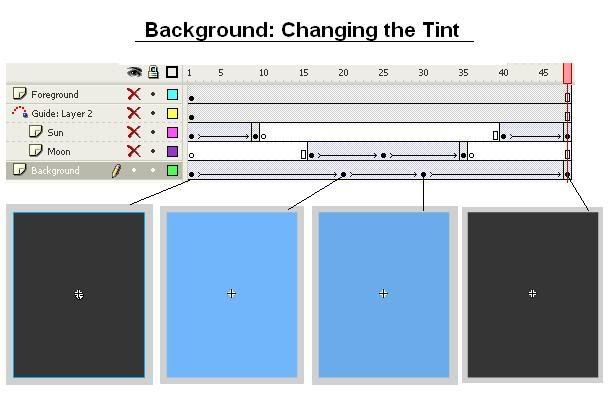
Here is the overview of the movieclip timeline. You can refer to this later:
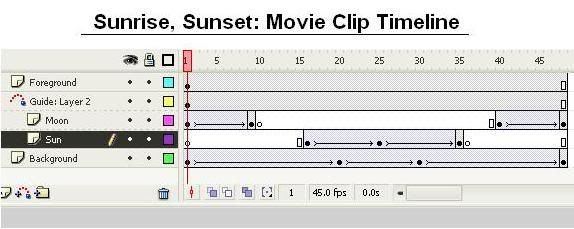
We will go through each layer individually.
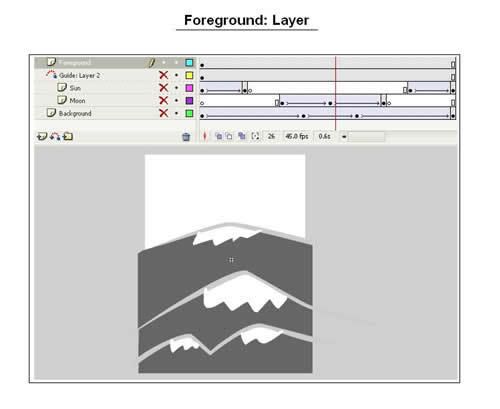
Foreground:
This will be the top most layer and will be the graphic you would like to display in the forefront of the landscape. This can be anything to your liking such as trees, houses, buildings. For this example, we use a mountain range. Be sure not to cover up the whole stage, or else you will not be able to see the background sky change colours. Don't mind the other layers on the picture below:
Background:
The background will contain the sky graphic symbol undergoing a motion tween (colour change).
First off, we need to determine the appropriate colours of the sky at various times of day while keeping in mind that there are 48 frames to represent 24 hours in the day. Here is what I chose. This is a very plain and vague colour scheme which can be definitely improved upon.
Frame 1 (Midnight): #000000 (will look like #353535)
Frame 20 (10:00 am): #4CA3FA (will look like #71B6FB)
Frame 30 (3 pm): #4CA3FA (will look like #71B6FB)
Frame 48 (11:00pm): #000000 (will look like #353535)
*IMPORTANT: Remember that our original sky symbol was white! This means that the symbol will appear a few shades lighter when you add the tint. The tint colour will not be equivalent to what is shown in the symbol!
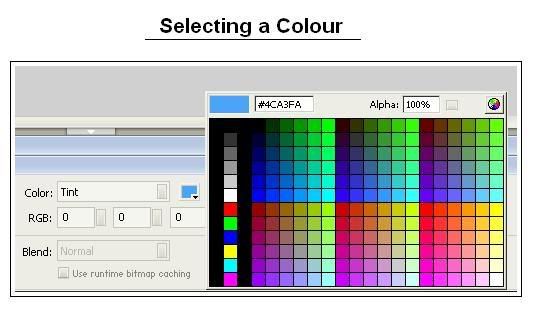
To apply these colour changes, first create keyframes on frames 1,20, 30 and 48, and apply a motion tween between them. Then select the keyframe and symbol, then select Color: Tint at the bottom properties menu. I chose Tint over Advanced because I can use the dropper tool to select the appropriate colour instead of guessing the RGB values.
Sun and Moon Layers:
These layers will use the same concepts as the sky colour change tweens except we add one more dimension: a motion tween guide. A motion tween guide lets the user designate a path for the symbol to travel while it is undergoing a motion tween. This is appropriate for the sun and moon animations because sunrise and sunsets have a curved path, not straight!
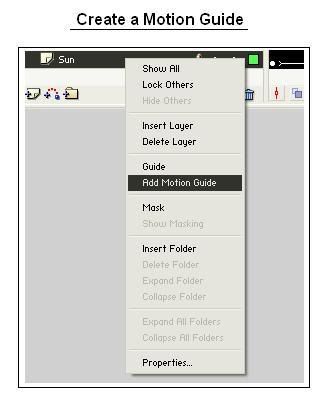
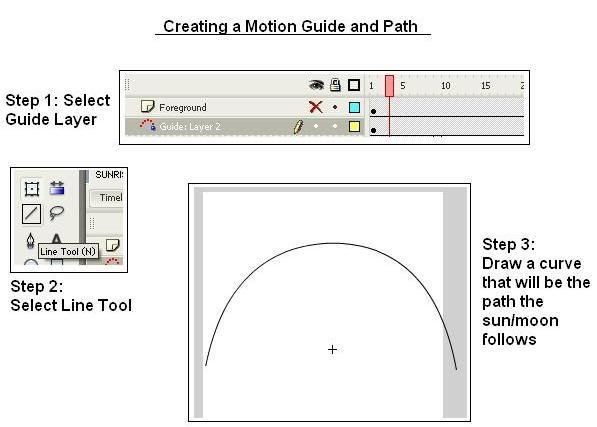
First create the two layers that house the Sun and Moon symbols. Next, right click the sun layer and select Add Motion Guide... This will create a new pseudo layer which will be the parent for the Sun. Next, move the Moon layer upwards so that it becomes under the Motion Guide as well. We put them in the same guide because for simplicity, they will rise and fall in the same path. (Look at the MovieClip Timeline picture)
After this is complete we have to start creating the path for the moon and sun to travel on. Selecting the Motion Guide layer, choose the line tool and roughly draw out a curve for which you want the sun/moon to follow. Now, remember that during the day, the moon doesn't need to be on stage, and during the night, the sun doesn't need to be on stage.
Frame 1 (Midnight)
Frame 20 (10:00 am)
Frame 30 (3 pm)
Frame 48 (11:59pm)
I decided the sun should rise at around 7/8ish am; this corresponds to around Frame 16. So, select the sun layer: Frame 16 and place the sun on the stage such that the crosshair is centered on one part of the curve you drew in the motion guide. Now, create a keyframe at frame 25; this corresponds to around 12 noon, so now, move the sun so that the cross hair is at the top of the curve. Now, create a keyframe at frame 35, and move the sun so that its the right most side of the curve.
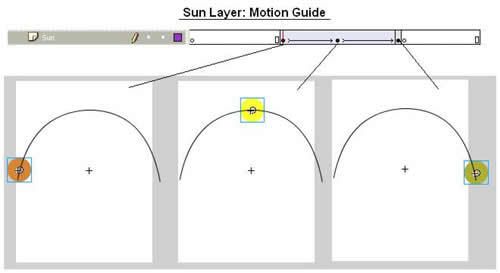
Now, you can select each keyframe (16, 25, 35) and change the colour properties of the sun: it is more orange during sunrise and sunset and more yellow during high noon. Fiddle around with the tint tool to get the best colour. You can see what I did in the above diagram.
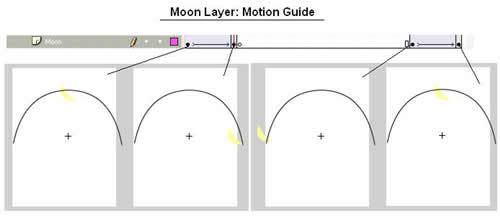
Now, we can repeat the same steps for the moon layer. But remember that because the moon rises at night, the motion tween will begin at the ENDS of the timeline. Make sure that the moon is placed in the exact same place at Frame 1 and 48, so it can be continuous.
The Main Timeline:
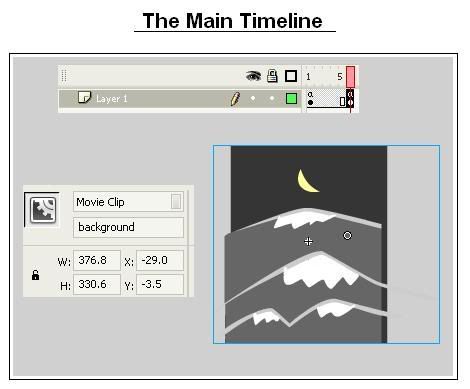
Now, place your created movie clip in the main timeline on frame 1. Select your movieclip, and give it the variable name: background. Create a keyframe at frame 6.
Right click Frame 1, add the following actionscript:
//this will get the current time and convert it to a number between 1 and 48.
/:theHour=FSCommand2("GetTimeHours") * 2;
/:theMinutes=FSCommand2("GetTimeMinutes");
/:hourFraction = Math.round((/:theMinutes/60) * 2);
tellTarget("background"){
gotoAndStop(/:theHour+/:hourFraction+1);
}
Right click Frame 6, add the following actionscript:
gotoAndPlay(1);
There you have it! Now compile and test it out! The movie will check the time every 6 frames and update the movieclip to reflect this. So in a sense, it seems continuous on the viewer's perspective. You can test this easily by previewing on computer, and changing your system's clock, and see the flash file update the background automatically!
EXTRA TIP: If you want the animation to seem more realistic, you can use motion tween easing for the movement of the sun and moon, so that it slows the most when it reaches the peak of the curve.
![]()
Labels:
dynamic wallpaper sunrise sunset flash lite tutorial
![]() Subscribe to RSS Feed
Subscribe to RSS Feed


12 comments:
Ciao,
great tutorial as usual!
Alessandro
swfup seems to be down, can you put this up on another service, I would like to test it out on my phone.
Great site!
Thanks for your tutorial my friend.
Great aplication.
René
www.27kmh.cl
Chile
Alexander: sorry about that; reuploaded, should work now.
Just tried this and i really were amazed how easy this was after all.
So few lines of script for a brilliant result as this.
Keep up the good work.
See ya !
Great tutorial. thanks
I'm lost at the last step "The Main Timeline:"
How do I create my movieclip and place it in frame 1 on the main timeline?
Rednik,
On the main timeline, select frame 1.
Open up your library (Ctrl L), then click and drag the movieclip you created onto the stage.
Very useful tutorial! :)
Thanks
I've only a problem:
I created the project, the background, foreground, effects... and a new layer for Action script code only:
Frame1: set fullscreen
Frame2: the time process and frame locate
Frame7: the gotoAndPlay(2)
The execution run the frames 1 and 2, but I can't achieve the execution of Frame7.
The flash movie is in the correct frame for current time but not actualization is achieved :(
Any suggestion?
Thanks in advance
Naty
On the main timeline, select frame 1.
Open up your library (Ctrl L), then click and drag the movieclip you created onto the stage.
Hi guys,
Don't know if this will help anyone, but I'm using CS3 and the original script returned errors. Just a few little tweaks got it going though:
//this will get the current time and convert it to a number between 1 and 48.
/:theHour =fscommand2("GetTimeHours");
/:theMinutes =fscommand2("GetTimeMinutes");
/:hourFraction = Math.round((/:theMinutes/60)*2);
tellTarget ("background") {
gotoAndStop((/:theHour) *2 + /:hourFraction+1);
}
excellent tutorial have been looking for a good dynaimc wallpaper and now ive made my own spot on.
Post a Comment