Battery Level and Reception Signal Tutorial
As per request from lithium3r, I've decided to write a short tutorial on how to create battery and signal gauges for flash lite applications. It is especially useful for those deciding to create flash lite menus, as that's one of the things you will usually see on them. We will take a look at creating a very simple battery gauge first.
*NOTE: The FSCommand2 functions shown in this tutorial only work on phones that support the function. Please refer to this for some info on Nokia phones.
Battery Gauge:
The two important commands used to retrieve battery level status are as follows:
status = FSCommand2( "GetBatteryLevel" );
status = FSCommand2( "GetMaxBatteryLevel" );
One function receives the current battery level while the latter retrieves the maximum level (in a numerical form of course). If your phone does not support this function (as in the case of the FL1.1 emulator), it will send back -1.
So what now? With these two values, you're pretty much creating a preloader to a flash movie essentially. First off, you need a movieclip that consists of the bar, with the crosshair being at the left most side of the bar.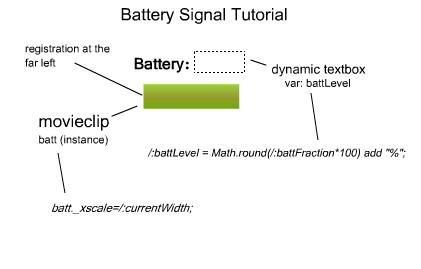
Then we proceed with the following two lines which you've seen:
/:currentBattery = FSCommand2( "GetBatteryLevel" );
/:maxBattery = FSCommand2( "GetMaxBatteryLevel" );
Now we'll calculate the fraction that will allow us to adjust the width of our bar accordingly:
/:battFraction = /:currentBattery / /:maxBattery;
This line is just formatting the fraction into percentage form in case you want to display it. In this case, you can create a dynamic textfield with var=battLevel to display the battery in percent form.
/:battLevel = Math.round(/:battFraction*100) add "%";
I've used Math.round() function here, but it seems as though it is not supported in some phones, so a better alternative may be using (int) truncation:
/:battLevel = ((int)(/:battFraction*100)) add "%";
Now we need to decide what the maximum width of the original bar is in order to scale it properly. In this case, I have called the instance to my movieclip 'batt':
/:maxWidth = batt._width;
Using the fraction calculated, multiply it with the maximum width to resolve the current width you will display:
/:currentWidth= /:battFraction * /:maxWidth;
Now we just set the width of the movieclip (batt) to its preferred width using the _xscale command.
**NOTE: batt._width or batt.width are READ ONLY functions in FL1.1:
batt._xscale=/:currentWidth;
There you have it, once you've done this you can take it for a test run. Beware, the FL1.1 emulator will not be able to return battery levels to you, so you will need to test with a real phone! However, I'd recommend predefining values for battFraction just to test out the code to make sure it works.
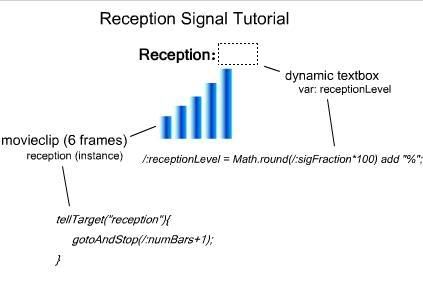
Reception Signal:
Surprising as it may seem, the two functions responsible to retrieve reception is very similar to what we've seen before:
status= FSCommand2( "GetSignalLevel" );
status= FSCommand2( "GetMaxSignalLevel" );
Like before, we can combine these two values to form a fraction, and then use it to change the width of a bar like the battery. However, from my experience of, reception signals are usually expressed in vertical bars of increasing height, so we will try to recreate this effect.
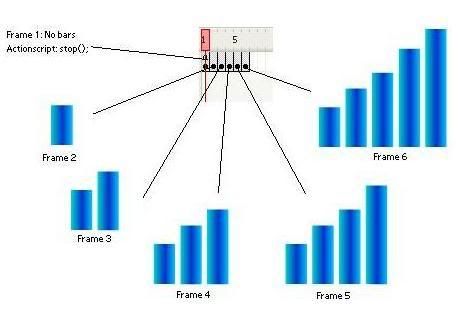
First off, lets talk about the vertical bars. You will need to decide how many bars in total you want to have. For simplicity sakes, I went with 5. Consequently, I will need 6 frames in my movie clip, one to show each state PLUS one frame for no bars (no reception):
/:currentSig = FSCommand2( "GetSignalLevel" );
/:maxSig = FSCommand2( "GetMaxSignalLevel" );
Now we calculate the fraction of full signal achieved.
/:sigFraction = /:currentSig / /:maxSig;
To calculate the theoretical number of bars we should have, we multiply the fraction calculated by the number of bars we had in our movie clip, which is 5. We perform Math.round because you can not display 3.48 bars, and thus we need to have a rounded number. Again, you can change Math.round() to int() instead, which will hopefully solve any compatiblity issues.
/:numBars = Math.round(/:sigFraction * 5);
This line is extra and used to format the percentage so that it can be displayed in a dynamic text box with var = receptionLevel:
/:receptionLevel = Math.round(/:sigFraction*100) add "%";
Now we call upon the instance of the movie clip that contains the 6 frames (of the bars). I called the instance 'reception'. We tell it to go to the rounded number of bars we calculated. Since frame numbers start at 1, we need to add on 1 to the variable. Recall that frame 1 = no bars, but /:numBars= 0 when there is no reception.
tellTarget("reception"){
gotoAndStop(/:numBars+1);
}
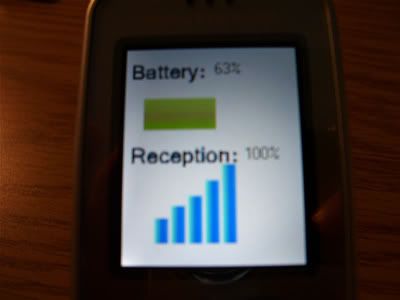
Once again, the emulator will not be able to provide values for the signal, so you will have to test using predefined variables. I hope this little tutorial has provided some insight on how this is done, I present you with a sample screenshot of the finished product:
![]()
Labels:
battery reception flash lite tutorial
![]() Subscribe to RSS Feed
Subscribe to RSS Feed


12 comments:
Could you upload that source code as ".fla" file?
Great guide btw :)
I agree great guide, but I'd like to see the .fla file for some minor issues I'm having with the code.
The source file or the Actionscript posted as one would be helpful, im still having problems with this.
Hi there, this is a great little concept for a tutorial, however like the previous guys comments, I am also having problems getting this to work, any chance of some source files...
Many thanks
Jason
Thanks for the useful tutorial. I tried it out on my phone but error thrown "Unable to open. File corrupted"
Could you uploaded the ".fla" file as per requested from the rest?
dude nice tutorial!.. thanks!.. but just found something wrong..
the line
/:battLevel = Math.round(/:battFraction*100) add "%";
should not have /:
thats all.. thanks again..
i've made the .fla, but it has one problem:
if i use:
gotoAndStop("reception",4);
(or any number from 1-7)
-> it shows me 4 bars
but
gotoAndStop("reception",numBars+1);
it doesen't show any bar !
i also tried
gotoAndStop("reception",Number(numBars+1));
still no change.
Here is the code:
http://depositfiles.com/files/2897888
http://rapidshare.com/files/80339165/nokia_6300_clock_battery_signal_u-nite-neo.fla.html
http://myfreefilehosting.com/f/14e3379e1a_0.1MB
Ok I got your Battery Code working to the dude above me..
Im working on the reception though... :P
Presada:
Bold/Italics indicate modified code
I've Modify Code for sony ericsson handset (K850i)
//발신음 (Signal)
currentSig = fscommand2("GetSignalLevel");
maxSig = fscommand2("GetMaxSignalLevel");
sigFraction = currentSig / maxSig;
numBars = Math.round(sigFraction * 5);
receptionLevel = Math.round(sigFraction*100) add "%";
bare=numBars;
sig1.text=String(receptionLevel);
info1.text="SigBars:"+String(numBars);
reception.gotoAndStop(numBars+1); }
Change:
numBars = Math.round(sigFraction * 5);
Change the 5 to 7 If your handset supports more than 5 Signal states, I removed some of the original images to accomodate my handset while testing.
Also I fixed your Battery code:
//배터리
currentBattery = fscommand2( "GetBatteryLevel" );
maxBattery = fscommand2( "GetMaxBatteryLevel" );
battFraction = currentBattery / maxBattery;
battLevel = Math.round(battFraction*100) add "%";
bat1.text=String(battLevel);
maxHeight = 100;
currentHeight= battFraction * maxHeight;
batt._yscale=currentHeight;
First of all you did not name your battery instance - Ive called it batt but in your original code the following changes would be needed:
batt._yscale=currentHeight;
To
battlevel._yscale=currentHeight;
And you would need to name your battlevel instance as battlevel (Its part of the instance battlevel but doesnt have an instance name)
Great tutorial!! Would love to try it out soon! Thanks and keep it up!
working 100% now!
11x henry
can you make a tutorial on how to display your network name etc please
Post a Comment