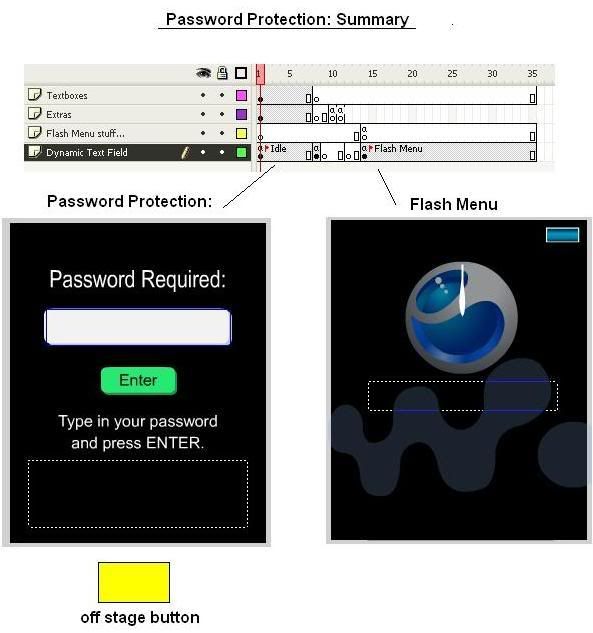
Lots of people I see on SE forums want their flash menu customized so that they are password protected. I guess it gives an extra dimension of privacy which is important for some. In this tutorial, we'll look at a simple solution to creating a fully functional password screen that can be customizable to whatever numerical password you wish.
This will be Part 1, which will give you the basics on how to create this password protection. Note that this is a simplified version and we will cover other things (how to backspace) in later tutorials. Here is a preview. Click on the swf and enter the password (15402) and press Enter.
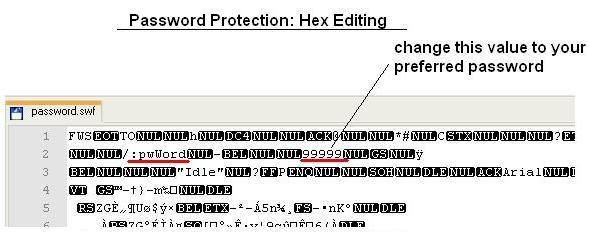
Is it possible?First off, let's talk about what's involved. For one, Flash Lite 1.1 does not support reading or writing to file. Second, it does not support so-called "flash cookies", or more officially, "Mobile Shared Objects". So what can we do? One solution I have proposed is simply designating your wanted password into variable name. The great thing about this is that the numerical values are preserved upon compiling such that the values can be read and consequently changed using a hex editor. So for one, you can customize the password by editing the swf in a hex editor. However, once on your phone, it will not be changeable, though it may be possible with some file explorer and text editing applications. Oh well, better than nothing right?
But wait, how about input fields? Why don't we just use one of those? Although it does allow for alphanumeric data entry, I find the system extremely tedious and requires the user to go through a lot of work just to enter data. I feel that a cellphone user doesn't want to spend a minute entering the password just to unlock a menu. Just try creating a simple input field and see how it functions on your cellphone and you'll see.
The AlgorithmThe way we will accomplish a password protection system without input text fields is by creating a mini loop at the beginning of the movie. A button listener will listen for digits pressed and the Enter button being pressed. It will compare it to the real password, and if valid, will allow the flash lite to proceed to the flash menu. We will mimic an input system by appending asterisks to a dynamic textfield as the user continues to press numpad buttons.
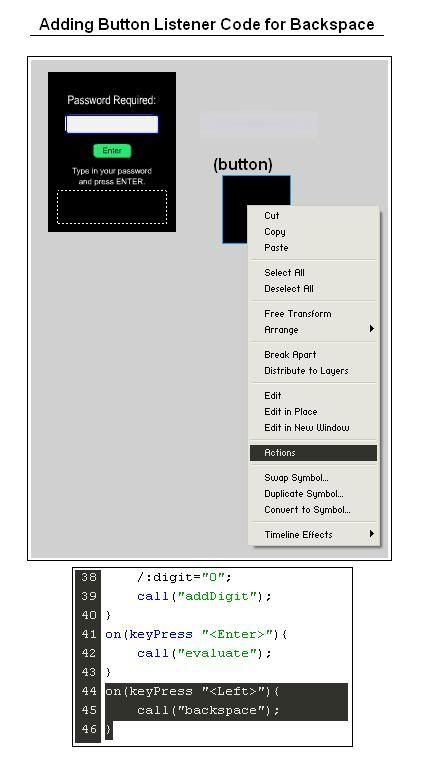
Let's BeginFirst off, we need to create a button. In the main timeline, create a layer and place the button on it so that it is not on stage. Right click and select Actions... to add this following code:
on(keyPress "1"){
/:digit="1"; call("addDigit"); }on(keyPress "2"){ /:digit="2"; call("addDigit"); }on(keyPress "3"){ /:digit="3"; call("addDigit"); }on(keyPress "4"){ /:digit="4"; call("addDigit"); }on(keyPress "5"){ /:digit="5"; call("addDigit"); }on(keyPress "6"){ /:digit="6"; call("addDigit"); }on(keyPress "7"){ /:digit="7"; call("addDigit"); }on(keyPress "8"){ /:digit="8"; call("addDigit"); }on(keyPress "9"){ /:digit="9"; call("addDigit"); }on(keyPress "0"){ /:digit="0"; call("addDigit"); }on(keyPress ""){ call("evaluate");}Yes, I know the code is quite repetitive, but I haven't found a more efficient alternative. Basically, this code relays the number that's pressed on the pad and passes it to a pseudo function using the call function. Pressing enter will call another function to evaluate the validity of the numbers pressed.
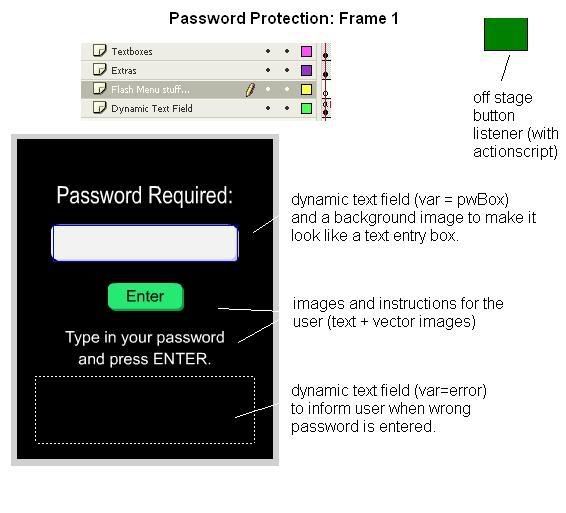
Now, create another layer. On frame 1, you will define the password you want to use:
/:pwWord=12345;For now, we can only use numbers, as it is the easiest thing to do. Give frame 1 a frame label called "Idle".
On frame 1, you will also need to add a dynamic textfield. Give it a var name pwBox. This will house the asterisks that will be appended when you press a numpad button; center the text and be sure to limit the textfield to one line. To mimic this textfield to look like an entry form, you can add a backgroup image that looks like a textfield.
You will need to add another blank dynamic text field with var = error. This will house any error messages that will pop up after you enter an incorrect password.
TIP: Make sure the font colour of the dynamic text fields are selected so that they are different from the background!You may also want to add some additional titles, prompts and some instructions on frame 1 to tell the user to enter a password.
Now, extend the duration of the frame to 7 frames. On frame 7, create a keyframe and add the acrionscript:
gotoAndPlay(1);This ensures that the movie stays in the password prompt area, and not proceed to the actual flash menu.
Now, create blank keyframes on Frame 8, such that all of the placed items are no longer on stage.
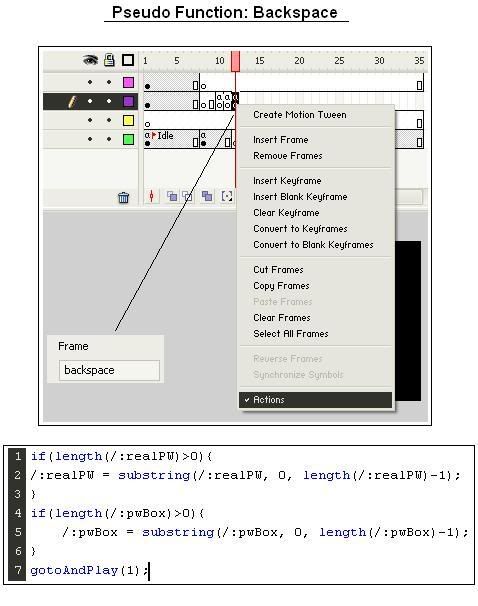
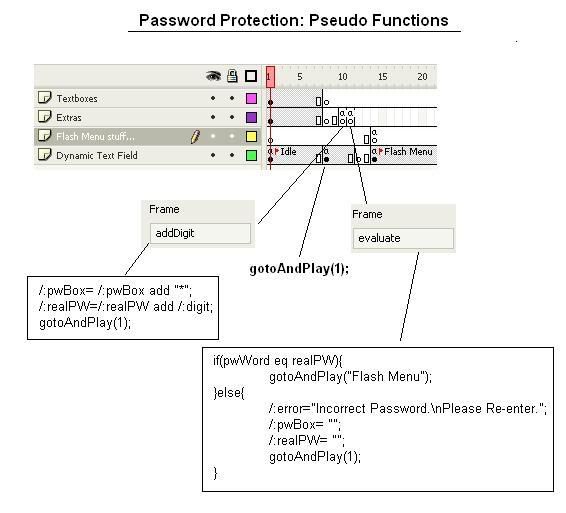
On frame 10, (on any layer you want), create a BLANK keyframe. Give this frame a label named 'addDigit'. This blank frame will contain the code to be executed when the user presses any numpad button, which will trigger the call function for 'addDigit'. Add the code:
//pwBox refers to the dynamic text field we have added in frame 1. By appending an asterisk, we give the effect that the password is actually being entered into the text field. In fact, this is NOT the case, we are simply appending to a variable./:pwBox= /:pwBox add "*";//the variable realPW represents the entered password; with every numpad button presses, it appends the value 'digit', which is declared in the button listener/:realPW=/:realPW add /:digit;gotoAndPlay(1);On frame 11, (on any layer you want), create a BLANK keyframe. Give this frame a label named 'evaluate'. This blank frame will contain the code to be executed when the 'enter' button triggers the call function for 'evaluate'. Add the code:
//this compares the defined password with the real password that has been entered by the user. We use 'eq' to compare strings.if(pwWord eq realPW){ //we advance to the actual menu is the password matches gotoAndPlay("Flash Menu"); }else{ //error refers to a dynamic text field that's at first empty in frame 1. Once the password is incorrect, text will pop up in the field prompting the user to re enter the password /:error="Incorrect Password.\nPlease Re-enter."; // if the password is incorrect, we need to immediately clear the previously entered password as well as the asterisks present in the text field. /:pwBox= ""; /:realPW= ""; gotoAndPlay(1);}Now, on frame 15, create a blank keyframe named "Flash Menu". This is where the flash menu can be placed. From the code above, you see that we jump to this keyframe when the password is correct.
Hex Editing to change PasswordThere you have it! A nice password protected flash menu. Now, for kicks, if you compile the swf and reopen the swf in a hex editor, you can easily see where the variable name is defined, and you can change it to whatever you like!
Something to think about:Nonetheless, there are some drawbacks to this method:
1) You can only use numerical passwords
2) Although the password length is essentially as long as you want it to be, the text field that contains the asterisks will overflow.
3) You can't backspace at the moment (check back for a later tutorial)