The Essence of a Flash Lite Menu
DISCLAIMER: Developing flash lite menus are not as simple as you think. It is strongly recommended that you become familiar with Actionscript syntax as well as understand how flash works. I am NOT liable for any damage this tutorial may have caused on your computer or cellphone. This tutorial is intended only for developing flash lite themes on the Sony Ericsson flash enabled phones.
With the advent of Flash Lite 1.1 (and now 2.0), cellphones (Nokia, Sony Ericsson) have become one of the major devices to be able to use feature. Flash lite 1.1, just like any flash file provides a myriad of opportunities to create programs and applications and at the same time coupling it with stunning visual aesthetics. For more information about Flash lite, you can read up here.
*NOTE: This guide is only for Sony Ericsson Flash Enabled Phones!
After careful consideration, I have decided to NOT post a step by step tutorial on how to create a flash lite menu. Having been developing flash applications for several years now, the creation of a flash lite menu must truly lie in the hands of someone who is extremely familiar with the ins and outs of Flash and Actionscript. Thus, if you are one of these people, the following code will prove to be invaluable to you.
Here are the essentials to creating a flash menu.
Setting up the Flash Environment
Before we start creating the flash menu, it is important to understand a few concepts.Cellphone Resolution
You will have to decide on a screen size for which your movie dimensions will be based on. This can be easily determined by determining the screen resolution (pixels) of your cellphone. For example, the Sony Ericsson w300i is 128 x 160. Therefore, I would create a flash movie with this resolution. However, since flash movies can be dynamically resized by the cellphone, larger size flash movies can be created. One drawback will be that due to the limited resolution of your phone, resized movies will look 'pixelated' and jagged.
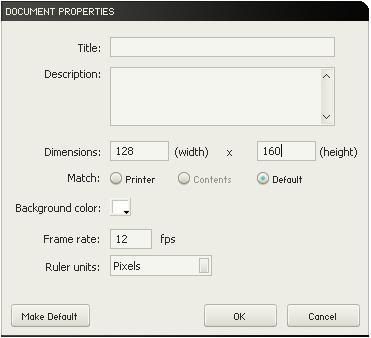
On the timeline, double-click the box that shows your current frame rate, and change the resolution to the appropriate size.
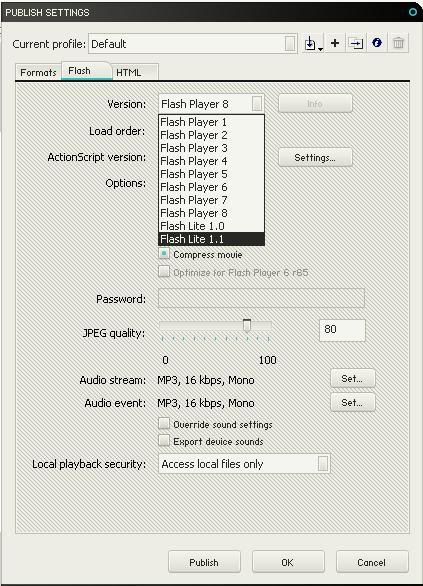
Compile with Flash Lite 1.1
Icon Selection for Menu
At one point or another, you will have to decide what type of icons you will plan to use for your menu. If you plan making them on your own, I'd advise to refrain from creating complex vector graphic icons within Flash. Although viewing these files on your computer is not a problem, you need to consider the very limited processing capability a cell phone has. The more edges you have, the harder and longer it will take for the cellphone to display it. Thus, it is a good idea to either:
a) Make icons in flash but keep them simple (avoid icon outlines)
b) Create icons, save as bitmaps and import.
Please note that flash does not do a good job at shrinking bitmaps, and therefore the quality will be greatly reduced if you resize them. Thus you will want to resize the bmp to a correct resolution before importing so there is minimal quality loss.
Important Notes!
1) Movie Clip that contains an icon in each frame.
Due to the limited coding functions available with Flash Lite 1.1, and other optimization considerations, I have found that it is truly necessary to setup up your icons in one Movie Clip and then call it to a specific frame:
tellTarget(Icon_icon1){
gotoAndStop(1);
}
Where 'icon1' is the instance name of your movieclip. Thus, this movie clip will have 12 frames because there are 12 icons in total.
2) Button Reactions
Take a look at the KeyPress Tutorial to see what I'm referring to. This will be crucial in setting up how your application responds to button presses
3) Receiving the Titles
Remember in the Menu System, how there is a title for each icon? Lo and behold, these names actually are being sent to the flash application from the cellphone itself. Thus, you will have to import this information using this line:
loadVariables("application://focused","_level0")
You will have to have this line of code right at the beginning of the flash file so that it loads instantaneously.
4) Displaying the Titles
Now that you have the titles, you need to put them somewhere. This is where the dynamic text box comes in. In your main timeline, you will have to set at LEAST 14 frames:
Frame 1: Receiving the titles (see pointer 3)
Frame 2: Stop() - this is where your menu stays idle until it receives input
Frame 3-14: Each of these frames will have a dynamic text box. Beside the VAR property is where you will set the variable name. These have predetermined variables names that you MUST use:
DIL_PRE_PLAY_LINK_TXT
OLP_TITLE_TXT
MENU_ENTERTAINMENT_TXT
MENU_CAMI_TXT
MENU_MSG_MESSAGING_TXT
DB_DATABROWSER_TXT
MENU_PHONEBOOK_TXT
MENU_FM_RADIO_TXT
MENU_CALLS_TXT
MENU_ORGANIZER_TXT
MENU_SETTINGS_TXT
Each one of these variables corresponds to the icon. Notice how theres no variable name for Walkman Player. This is because there is no display text for it! The previous flash lite menus use an picture of the Walkman Logo. So feel free to conjure something up here yourself.
*IT IS IMPERATIVE: that you order these dynamic text frames the same way as you order your icons in the Movie Clip. It will make it much easier to coordinate and display them using a counter.
5) How to Activate the Menus
Now that you know how the menu labels are set, you need to send out the action once your user has pressed a button to select the menu.
getURL("application://" add appVar,"");
This is the line of code that will complete the request. Please note that appVar is a variable, and will correspond to the specific menu you want to execute. Thus, appVar can be:
"PlayNow"
"InternetServices"
"Entertainment"
"Camera"
"Messaging"
"MediaPlayer"
"FileManager"
"Phonebook"
"FMRadio"
"Calls"
"Organizer"
"Settings"
Replacing appVar with one of the above strings will cause the cellphone to respond by going to that specific menu system in the phone. Thus you can see that a button will respond to a SELECT function by doing this:
on(keyPress "<Enter>"){
appVar="Settings";
getURL("application://" add appVar,"");
}
6) Putting it all together
For a side scrolling menu, the KEY CONCEPT is using a counter! Using the icon movie clip, you can easily display a set of 5 icons by placing the same movie clip and setting it to an incrementing variable:
for(/:x=0; /:x<5;>
tellTarget("icon" add /:x){
gotoAndStop(/:x)
}
}
Where "icon" add /:x refers to the instance name of each icon Movie Clip (ie - icon1, icon2, icon3, etc.).
Left and right buttons will just trigger a motion tween that moves this array side to side. Remember to add one additional movie clip icon on each side of the stage so that when you move the icons, icons will not be missing from one side. Then after the tween, change up the counter and redisplay your icons in the original configuration, but increment the display counter by 1, which effectively shifts everything.
Lastly, creating frame labels for specific sequences so that you can easily call upon that frame to execute when you press a button:
on(keyPress"<Left>"){
gotoAndPlay("left");
}
Once the left button is pressed, it will cause the flash application to goto the frame labelled left. Therefore, it's just a matter of creating specific animations that will lead the desired effect.
I leave you with one last gift, my timeline setup menu:
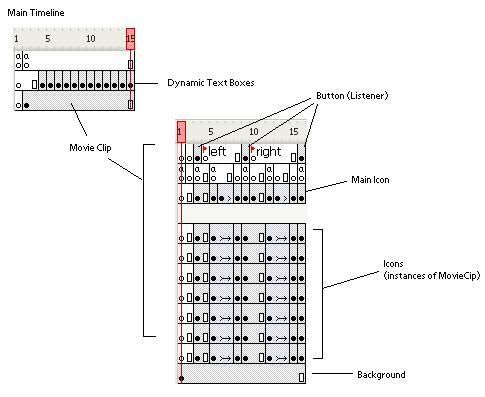
This guide was took a long time to think of and write down. I hope everyone enjoys this.
![]()
Labels:
flash lite tutorial essence
![]() Subscribe to RSS Feed
Subscribe to RSS Feed


9 comments:
Hey that'z great guide.. I will try this out.. Tx for sharing..
RhythmicDias
Does anyone know how to make, create or edit .swf files? These are used as the flash themes on my w810 phone. I have used Google and cant find out. The reason I ask is because I was trying to use StreetStyle.swf with a Sony Ericson W810 Theme I have and on the phone the top left Icon Says "Hit Picks" and my phone doesn't know what to do when it is clicked so I wanted to change or remap the icon. Thank you for this info. It is all I have found so far...
These comments have been invaluable to me as is this whole site. I thank you for your comment.
I need to step by step this tutorial more detail.Please
Sorry my bad english
I know that this post is specifically for SE, but I was curious. My phone, which is a Japanese phone, acknowledges some .swf files as "movies", some as "graphics", and some as "menu icons"... I was wondering if that same distinction is made on other phones, and if so you can tell me where that distinction lies in file production.
Excellent material, I've learnt a lot from this page, and as I can see I will continue doing it. My main concern was how to interface with the phone itself, being a Flash developer myself for some years I knew how to do some things, but I got real good information on all those other things specificaly related to the SE phone flash implementation. My kudos to the author.
Flash Lite Menu... Finally found really useful information on the topic, thank you.
Is there a way to get into sub applications like notes and calendar etc? Because this will go well with my iPhone theme
Cool stuff out here! Am actually doing some flash project so curiosity pushed me toward se modding as i also understand these!! I wanted to know how these guys creates their own menus! In fact the piece of codes were unknown till I met your tuto! Thnx!! Keep It up!!
Post a Comment