Sunday, 25 March 2007

W550i Frame Rate Profile


After showing interest in my frame rate profile benchmark, Andi, who owns an SE w550i decided to run the benchmark on his phone and collect some data. Thanks to him, I have the privelege to share the results with everyone, including the data in Normal and Fullscreen mode:


From these graphs, you can see that the results are not much different from what I came up with for the W300i: Here's a scatterplot to illustrate:

So there you have it. It seems like the W550i also runs most effective at around 40-45 fps. Though theoretically, the 'best' time ratio would be at fps=1, it really doesn't serve a purpose when you want to create animations.
I'm looking for Nokia phones to test this with. Are you interested? phirewerkz at gmail dot com

Wednesday, 21 March 2007

Choosing the Frame Rate (W300i Time Profile)


So what is a good frame rate to choose for flash lite animations? Does a faster fps necessarily mean a faster, more optimal animation? It's a balance between smoothness of the animation vs the capacity of the cellphone to render. Let's take a look at one example:

Remember the Benchmark Animation Results? Well, all those tests were performed at 100fps. However, what happens if we choose different ones? What about 50, 120? Will the amount of time taken to render differ? I took out the w300i again for some testing.

This time, we have the same animation, but I've changed the frame rate. They increase as follows: 15,20,25,30,35,40,41,42,43,44,45,50,60,70,...120. Why did you I choose it this way? You can see from the graph below that there is a huge change in the rendering time between 40 and 45fps. The graph compares the theoretical (dark bars) vs. the actual time (light bars):


I was honestly really surprised at this! What's up with the huge change in render time? This data doesn't look too conclusive though. Let's run a couple more trials and calculate the time ratio. Recall, time ratio:

Time Ratio = Actual Time/Theoretical Time

After calculating this, let's look at the results:


Wow. There seems to be two extremely linear portions, showing a direct correlation between render time and frame rate: The higher frame rate, the RELATIVELY longer it takes to render. I'm NOT saying it takes longer it render, but the ratio is increased. The two linear portions are separated by a large dip, specifically 40-45 fps.

So from this graph, you can see that higher FPS doesn't necessarily mean a better relative render time. Moreover, the optimal FPS seems to lie around the 44-45 FPS range. This is quite surprising.

Remember: this is only for the W300i. I'd love to create some more time profiles for other model phones. If you'd like to contribute, please let me know! phirewerkz at gmail dot com.


Sunday, 18 March 2007

Flash Lite Animation: Benchmark Experiment


Introduction
Creating flash lite menus is really a balance between visual aesthetics and possibly slowing down your menu due to the limited processing speed a cellphone has. As of lately, I've been wondering, do some phones run flash lite applications more efficiently than others? Although most applications are not visually extensive, I figured it would still be interested to find out which ones are more suitable for this.

Acknowledgements:
I would personally like to thank Matt Pollitt, Hayden Porter, Jameel Mulani, vivek, DenisR5, evilhomura89 and lithium3r for providing their phones as test subjects for this experiment.

Methods
The benchmark consists of a mini flash application that animates a black circle that moves in a circular motion. Based on calculations (100 fps, the animation lasts 200 frames), the optimal duration of this clip should last 2 seconds. Indeed, if you run the swf on a modern computer, it clocks out at around 2000 ms. The animation is sized for a w300i (my phone), but should work for any flash enabled phone since flash can dynamically resize their movies.


After the animation is complete, it will display the time taken to complete the animation as well as a variable I've defined as "time ratio":

This ratio = (actual time to complete animation) / 2000.

Thus, an optimal ratio would be 1. Likewise, if you have a ratio of 3, it means that your phone takes 3 times as long as how the flash would run on normally. Thus, the time ratio is a measure of how fast your cellphone processor is able to process the animation.

Materials:
The following phones were subjected to this test:
Nokia e61 Nokia 3650
Noka n93 Sony E W300i (2)
Nokia e50 Nokia 6131
Nokia 3250 Nokia 5300
Nokia n80 Nokia 7373
Nokia n91 Sony E W810i (3)
Nokia e70 Sony E W850i (3)
Sony E W600i
*Parentheses beside the phone model represent the number of phones of that model tested. If unstated otherwise, there was only one model tested.

The files used were created in Flash 8, named Benchmark.swf.

Procedure:
Each phone uploaded the swf file to their phone and ran the swf file in "Normal" and "Fullscreen" Mode. The Time Ratio for the Normal viewing mode was noted and repeated 5 times. Likewise, the Time Ratio for the Fullscreen viewing mode was ran 5 times as well. Afterwards, the average of the time ratios for each category were calculated and tabulated.

Observations:
All of the aforementioned phones were tested with the benchmark in two viewing modes (Normal, Full screen) and their results are shown in graphical form in increasing time ratios:


Results:

Nokia vs. Sony Ericsson
The wide range of phones being tested was really unexpected. The results are especially interesting when comparing the Nokia vs Sony phones. From the graph, one can see that the Time Ratio phones for Nokia phones are significantly lowered than Sony Ericsson phones.

Normal vs. Fullscreen
Also, SE phones seemed to suffer more from running the flash lite benchmark full screen whereas Nokia phones exhibited a negligible difference. This may be due to the fact that these SE phones only have browser compatibility for Flash Lite which probably places more load on the processing as compared to running it standalone.

Screen Size vs. Time Ratio (Sony Ericsson phones)
It's also interesting to see that the Time Ratio for SE phones seems to be strongly correlated with the screen size of the phone. I guess this is similar to running graphic intensive flash files at greater resolutions on computer.


Observations:
It is clear that flash lite files running on cellular phones are much slower if they involve graphic intensive animations. Moreover, the time it takes to complete the animation may be 3-fold as long or more. These results are in no way conclusive: For all I know, some of these values may not be representative of the processing speed of the phone model in general, so there is a certain degree of error associated with these results. Also, only one swf file was used for testing, which had a resolution of 128 x 160. A potential error could be that stretching the movie may have caused slower processing, though this does not seem to be the case.

One of the test phones according to the user seemed to achieve faster time ratios when certain numpad keys were pressed down while the benchmark ran. I’m not sure how this happens, but I’ll look into it in the future.

This is just the beginning of benchmark tests. There are still many variables to consider such as selected frame rate: perhaps there is a frame limit on animations? Does faster frame rates necessarily mean your phone will process faster? Does the type of animation (changing position, alpha, etc) change the render time? We've already looked at one of these comparisons, and that is Bitmap vs. Vector animations, which you can find here.

So why is this important? It is important for developers to consider the types and extent of animations they want to place in their applications. Although this benchmark is a crude exaggeration of animation, it is still important to consider when adjusting the frame rate of your animation. Usually when creating animations on a moderately fast computer, a FPS of 50 is sufficient to create the smoothest animation the eye can see. However, you MUST keep in mind that the cellphone playing these SWFs have a much more limited processing capability, and you will find that animations play on a much slower scale.

Conclusion:
From these tests, one can see the wide range of processing capabilities of Flash Lite enabled phones. For now, Nokia seems to have an upper hand in processing animations, and may just be due to the fact that their models support standalone compatibility whereas SE phones are browser-only. Once again, I'd like to extend my thank you to those who have helped me collecting data and providing motivation.

Wednesday, 14 March 2007

Bitmaps vs. Vectors


Sooner or later, you'll be deciding on the type of GUI you'll be using in your flash application. One important consideration is the usage of vector versus bitmap images. On one hand, vector graphics, due to their mathematically derived functions, are able to be sized without much quality loss. However, when it comes to rendering vector graphics, it does take longer to render.
For bitmaps images, resizing (espeically in Flash) can be an issue since you will lose much of the quality of the picture. However, it is much easier for the program to render and animate.

So what's the trade? Obviously, it is quality and speed of rendering. To a certain degree, you can have the best of both worlds. Consider the following flash creation: It is a animated bullseye moving in a circular clockwise motion. Why a bullseye? Firstly, a circle contains the maximum number of edges per polygon. Moreover, creating a bullseye pattern multiplies the number of edges around 2 fold for each additional ring. The animation is recreated once in bitmap form and vector quality:


Each bullseye is programmed to move in a circular motion 10 times. But adjusting the fps you can calculate the theoretical time it should take for the animation to complete. Likewise, if you use the getTimer() function, you can determine the actual time it takes for the animation to complete. Dividing these two values will yield the Time Ratio, which is the number of times longer it takes to complete the animation. This animation was tested on the SE W300i:


The results are quite significant: using bitmap form, the time ratio is 3.88 whilst for vector form, it is 4.26. From this little experiment, you can see that choice of graphic type can really impact your project especially if it is graphic intensive (flash lite menu).

So what can you do? Yes, for complex, animated objects, bitmaps are better suited. However, before importing them, you can resize them using a photo editing program such that the quality is not lost. Moreover, after importing, you can right click the picture, choose properties and select the quality retained in the picture. By following these steps, your bitmaps can remain sharp and will decrease the load on your cellphone.

For vector objects, it's important to keep things simple. This means removing any unnecessary edges and corners in any shapes. Be sure to use the optimize feature (Ctrl+Alt+Shift+C) to decrease the corners and edges.

Also refrain from using borders around objects because it will double the amount of edges required to be rendered (like the bullseye scenario). Also keep in mind that due to the limited resolution many cellphones, sometimes the quality of the vector won't look much different than the quality of the bitmap!

Tuesday, 13 March 2007

The Soft Keys (Flash Lite 1.1)


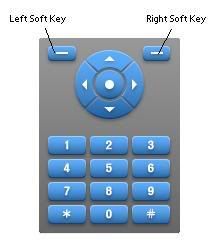
In the previous tutorial, How To Detect Button Presses. I didn't really cover much about the soft keys. The soft keys, on most phones, refer to the top left and right unlabelled buttons on your phone:


These buttons are especially useful in navigation and would seem logical to include these in menu selection. Traditionally, the left soft key in a menu selects and activates that menu, while the right soft key exits the menu system. However with more advanced cellphones with keyboard functions, there can be more than 2 soft keys. We will take a look into how this is done.


First off, we need to look at two pieces of code:

FSCommand2("setSoftKeys", soft1, soft2);

This is an fscommand2() function, which contrasting fscommand() is immediately gets activated without waiting for the frame to end. This command needs to be at the beginning of your flash file for your soft keys to be operable. The variables soft1 and soft2 represents the labels you will have on your keys (shown at the bottom left and right side of your screen). Thus, for your menu, if you want the left button labelled Select and right button labelled Exit, you would do this:

FSCommand2("setSoftKeys", "Select","Previous");

Now you have another decision to consider, do you want your flash file to be fullscreen? There are two ways around this:

a) Yes! I want fullscreen!
You will need this piece of code:

FSCommand2("fullscreen", "true");

Here's the added bonus: you will see the labelled buttons appear at the bottom (via your first line). That is to say, you'd see Select and Previous labels.

b) No, no fullscreen!
This is acceptable as well, the flash still shows fullscreen (*I'm referring to implementing menus here, not just swf files - if you're just viewing a swf file, it will not be fullscreen in this instance). However, only a left label that says "Select" will be shown. Although your soft keys will be functional, you will not see the assigned labels you used. In this method, you will also need to allocate some room at the bottom movie to accomodate for the label. Or else, that "Select" label will overlap anything you have there.

And lastly, now that we have that sorted out, you're ready to use your soft keys!

on(keyPress "<PageUp>"){
//do your action here
}

Remember in Flash 1.1, left soft key refers to <PageUp>, and right soft key refers to <PageDown>.

Monday, 12 March 2007

Custom Theme: ElementsIconSuite for the w300i


Here' s a teaser for you:

Sunday, 11 March 2007

Collaborations


Are you an experienced flash designer, programmer and/or vector artist that have some original ideas for flash lite menu creations? Feel free to contact me about potential future productions of flash lite menus! (phirewerkz at gmail dot com)

The Essence of a Flash Lite Menu


DISCLAIMER: Developing flash lite menus are not as simple as you think. It is strongly recommended that you become familiar with Actionscript syntax as well as understand how flash works. I am NOT liable for any damage this tutorial may have caused on your computer or cellphone. This tutorial is intended only for developing flash lite themes on the Sony Ericsson flash enabled phones.

With the advent of Flash Lite 1.1 (and now 2.0), cellphones (Nokia, Sony Ericsson) have become one of the major devices to be able to use feature. Flash lite 1.1, just like any flash file provides a myriad of opportunities to create programs and applications and at the same time coupling it with stunning visual aesthetics. For more information about Flash lite, you can read up here.

*NOTE: This guide is only for Sony Ericsson Flash Enabled Phones!

After careful consideration, I have decided to NOT post a step by step tutorial on how to create a flash lite menu. Having been developing flash applications for several years now, the creation of a flash lite menu must truly lie in the hands of someone who is extremely familiar with the ins and outs of Flash and Actionscript. Thus, if you are one of these people, the following code will prove to be invaluable to you.

Here are the essentials to creating a flash menu.

Setting up the Flash Environment

Before we start creating the flash menu, it is important to understand a few concepts.

Cellphone Resolution
You will have to decide on a screen size for which your movie dimensions will be based on. This can be easily determined by determining the screen resolution (pixels) of your cellphone. For example, the Sony Ericsson w300i is 128 x 160. Therefore, I would create a flash movie with this resolution. However, since flash movies can be dynamically resized by the cellphone, larger size flash movies can be created. One drawback will be that due to the limited resolution of your phone, resized movies will look 'pixelated' and jagged.
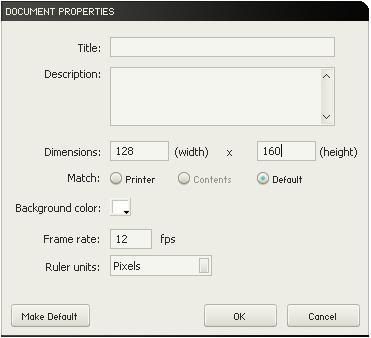
Movie Resolution

On the timeline, double-click the box that shows your current frame rate, and change the resolution to the appropriate size.

Compile with Flash Lite 1.1
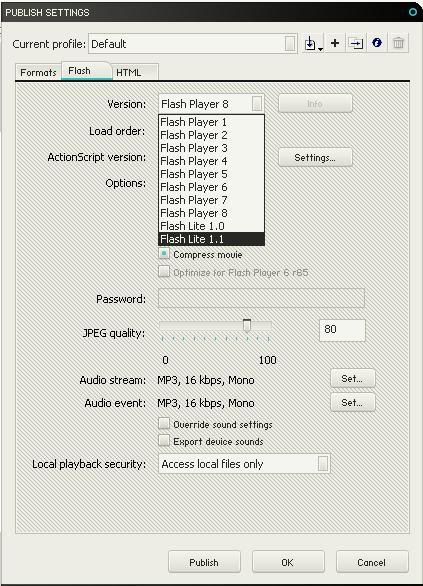
Select Version
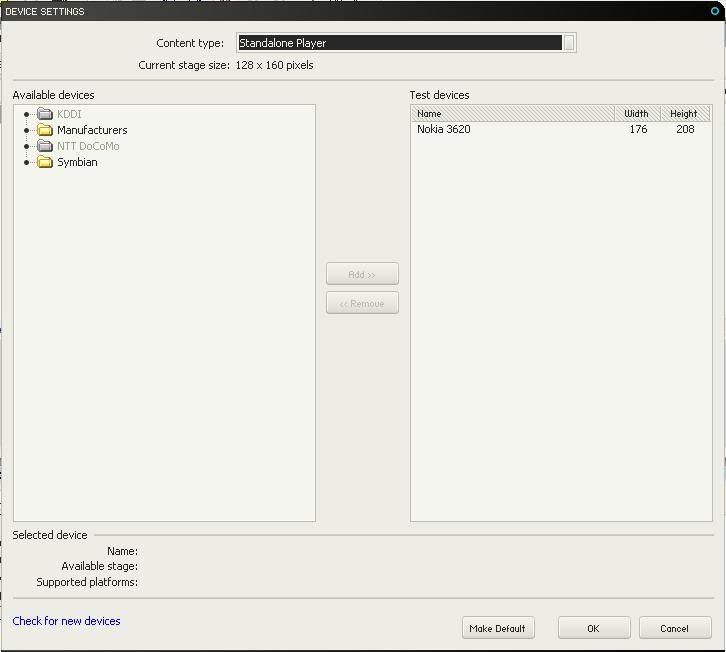
Goto File -> Publish Settings. Click the 'Flash' tab. Beside Version, choose FlashLite 1.1 in the dropbox. Although some phones support FlashLite 2.0, we will stick this for now. You will also need to select a device model to emulate when you compile and preview your work. I don't think it really matters which one you choose:


Icon Selection for Menu
At one point or another, you will have to decide what type of icons you will plan to use for your menu. If you plan making them on your own, I'd advise to refrain from creating complex vector graphic icons within Flash. Although viewing these files on your computer is not a problem, you need to consider the very limited processing capability a cell phone has. The more edges you have, the harder and longer it will take for the cellphone to display it. Thus, it is a good idea to either:
a) Make icons in flash but keep them simple (avoid icon outlines)
b) Create icons, save as bitmaps and import.
Please note that flash does not do a good job at shrinking bitmaps, and therefore the quality will be greatly reduced if you resize them. Thus you will want to resize the bmp to a correct resolution before importing so there is minimal quality loss.

Important Notes!

1) Movie Clip that contains an icon in each frame.
Due to the limited coding functions available with Flash Lite 1.1, and other optimization considerations, I have found that it is truly necessary to setup up your icons in one Movie Clip and then call it to a specific frame:

tellTarget(Icon_icon1){
gotoAndStop(1);
}


Where 'icon1' is the instance name of your movieclip. Thus, this movie clip will have 12 frames because there are 12 icons in total.

2) Button Reactions
Take a look at the KeyPress Tutorial to see what I'm referring to. This will be crucial in setting up how your application responds to button presses

3) Receiving the Titles
Remember in the Menu System, how there is a title for each icon? Lo and behold, these names actually are being sent to the flash application from the cellphone itself. Thus, you will have to import this information using this line:

loadVariables("application://focused","_level0")

You will have to have this line of code right at the beginning of the flash file so that it loads instantaneously.

4) Displaying the Titles
Now that you have the titles, you need to put them somewhere. This is where the dynamic text box comes in. In your main timeline, you will have to set at LEAST 14 frames:

Frame 1: Receiving the titles (see pointer 3)
Frame 2: Stop() - this is where your menu stays idle until it receives input
Frame 3-14: Each of these frames will have a dynamic text box. Beside the VAR property is where you will set the variable name. These have predetermined variables names that you MUST use:

DIL_PRE_PLAY_LINK_TXT
OLP_TITLE_TXT
MENU_ENTERTAINMENT_TXT
MENU_CAMI_TXT
MENU_MSG_MESSAGING_TXT
DB_DATABROWSER_TXT
MENU_PHONEBOOK_TXT
MENU_FM_RADIO_TXT
MENU_CALLS_TXT
MENU_ORGANIZER_TXT
MENU_SETTINGS_TXT

Each one of these variables corresponds to the icon. Notice how theres no variable name for Walkman Player. This is because there is no display text for it! The previous flash lite menus use an picture of the Walkman Logo. So feel free to conjure something up here yourself.

*IT IS IMPERATIVE: that you order these dynamic text frames the same way as you order your icons in the Movie Clip. It will make it much easier to coordinate and display them using a counter.

5) How to Activate the Menus
Now that you know how the menu labels are set, you need to send out the action once your user has pressed a button to select the menu.

getURL("application://" add appVar,"");

This is the line of code that will complete the request. Please note that appVar is a variable, and will correspond to the specific menu you want to execute. Thus, appVar can be:

"PlayNow"
"InternetServices"
"Entertainment"
"Camera"
"Messaging"
"MediaPlayer"
"FileManager"
"Phonebook"
"FMRadio"
"Calls"
"Organizer"
"Settings"

Replacing appVar with one of the above strings will cause the cellphone to respond by going to that specific menu system in the phone. Thus you can see that a button will respond to a SELECT function by doing this:

on(keyPress "<Enter>"){
appVar="Settings";
getURL("application://" add appVar,"");
}

6) Putting it all together
For a side scrolling menu, the KEY CONCEPT is using a counter! Using the icon movie clip, you can easily display a set of 5 icons by placing the same movie clip and setting it to an incrementing variable:

for(/:x=0; /:x<5;>
tellTarget("icon" add /:x){
gotoAndStop(/:x)
}
}

Where "icon" add /:x refers to the instance name of each icon Movie Clip (ie - icon1, icon2, icon3, etc.).

Left and right buttons will just trigger a motion tween that moves this array side to side. Remember to add one additional movie clip icon on each side of the stage so that when you move the icons, icons will not be missing from one side. Then after the tween, change up the counter and redisplay your icons in the original configuration, but increment the display counter by 1, which effectively shifts everything.

Lastly, creating frame labels for specific sequences so that you can easily call upon that frame to execute when you press a button:


on(keyPress"<Left>"){
gotoAndPlay("left");
}

Once the left button is pressed, it will cause the flash application to goto the frame labelled left. Therefore, it's just a matter of creating specific animations that will lead the desired effect.

I leave you with one last gift, my timeline setup menu:
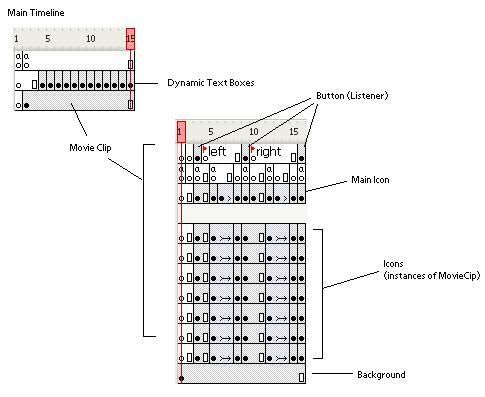


This guide was took a long time to think of and write down. I hope everyone enjoys this.

Friday, 9 March 2007

Vibrate!


When I show my friends some of the flash lite menus created, they're always impressed when they see the theme that responds to key presses by vibrating the phone. We will look at how this works:

FSCommand2( "StartVibrate”, time_on, time_off, repeat )

Both time_on and time_off values are in milliseconds and signifying the duration the vibrate will or will not be functioning. If this command is not supported by the phone, it will return a value of 1 (otherwise 0).

You can see immediately that this handy function can easily be integrated into a flash menu system:

on(keypress "<left">){
//vibrate phone

FSCommand2( "StartVibrate”, 10,0,0);
//do something else
}

In the above code, the phone will vibrate once the left button is pressed. For a menu, you will most likely not repeat the vibrate, which is why repeat = 0. For rapid sucession button activation, the previous vibration will be stopped before the consequent one proceeds.

Thursday, 8 March 2007

How to Detect Button Presses


DISCLAIMER: I am NOT liable for any damage this tutorial may have caused to your computer or cellphone.

In order to create a flash lite menu, one of the most important things to establish is how the flash application will react to a button being pressed on your keypad. In Flash Lite 1.1, the easiest method of achieving this is to use actionscript in conjunction with a button.

Firstly, you will need to create a symbol as a button. After placing it on stage, right-click on it to select Actions and enter this:

on(keyPress "<Enter>"){
//put in response here

trace("Pressed Enter");
}


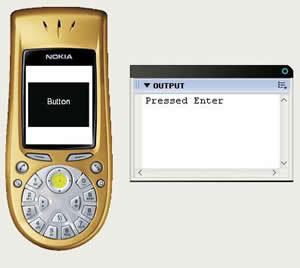
"<Enter>" reflects the key designation you are waiting for. The following lines between the brackets reflect how you want the application to respond to the button being pressed. In this case, the trace() method will cause the text "Pressed Enter" to be displayed in a debug window. For a flash menu system, the action performed by a key press would most likely trigger movement to the next icon in the menu array, but we will look into that later.

*Note:
"<Enter>" is the key designation for the button in the middle of the directional pad. Similarly, the key designation for the up button is "<Up>", down button is "<Down>". The number pad designation follows as "1","2", etc..

Cellphone ButtonKeypress Designation

0-9, *, #

Select key

Left Arrow key

Right Arrow key

Up Arrow key

Down Arrow key

Left soft key

Right soft key

0, 1, 2, 3, 4, 5, 6, 7, 8, -9, *, #

<Enter>

<Left>

<Right>

<Up>

<Down>

<PageUp>

<PageDown>
When you're finished deciding the actions, you can test compile to see what happens. In our example, you can see what happens:


It's important to keep in mind that this method does not require you to physically place the button somewhere. In the subsequent flash menu tutorials, you will see that the button is placed off of the stage so it can not be seen. Thus, for a flash menu, it acts more of a listener than anything.

In Flash Lite 2.0, you can actually create movie clip listeners that will listen for any key being pressed and return the identity of the key being pressed. For more indepth differences, you can take a look here.

Wednesday, 7 March 2007

How to Install Flash Lite Menus


DISCLAIMER: This guide is for Sony Ericsson phones ONLY. This guide assumes you have a strong understanding of flashing your phone with FAR+SEFP, PhoneXS, etc. I am NOT liable for any damage this tutorial may have caused to your computer or cellphone. Please visit SE-NSE if you have any questions about FAR+SEFP, PhoneXS or flashing your phone.

There have been quite a few finished flash lite menus circulating the internet which are quite impressive. Here's a quick run down on how to implement them into your Sony Ericsson flash lite enabled phone, since you need to associate them with a theme file.

*NOTE: In order to implement flash lite menus, your phone MUST support flash lite applications and it MUST be enabled. To find out if your phone supports Flash Lite, please go here.

*IMPORTANT: If you already have a flash menu file that comes with it's own thm file, you can skip to step 13.

1) Download TUGZip (link). You will need to create the thm file which is required.

2) Locate the swf (flash menu file) you will be using. Let's call ours custom.swf.

3) Either locate an existing theme file you want to use or create your own theme file (using Sony Ericsson Theme creator) - for simplicity, we will call ours theme.thm

4) Rename theme.thm to theme.tar

5) Open theme.tar (using winRAR) and extract the files to a specific directory.

6) Inside the extracted directory, you will find Theme.xml, open it up with your preferred text editor


7) The first couple lines should look like this:

<!-- Created with Sony Ericsson Themes Creator -->
<sony_ericsson_theme version="4.1">
<span style="font-weight: bold;">
<desktop_style type="File" source="custom.swf"></desktop_style></span>

<author_firstname value="phirewerkz"></author_firstname></sony_ericsson_theme>


8) If the theme.thm file you used was already linked to a flash theme file, then the bolded line should be present. However, if you've created your own theme, this line will not be present. So you will need to either:
a) Add this line in, replacing custom.swf with the name of the flash menu file you have OR
b) Edit this line, replacing custom.swf with the name of the flash menu file.

9) Save the file.

10) Open TUGZip and create a TAR archive of the files you had extracted (from Step 5) . (IE - the NOW edited theme.xml along with any thing else that was extracted). For this example, we will call it custom.tar. DO NOT include the swf file in this archive.

*NOTE: Using 7zip did not seem to work, as the cellphone would have an error when you try to set the theme.

11) Rename custom.tar to custom.thm

12) By this point, you now have custom.thm (which correctly points to your swf file) and custom.swf.

13) Now, breakin into your phone (Flash the main with header using PhoneXS, breakin with SEFP+FAR, or whatever you use). For precuation, make sure you fully charge your phone battery and remove SIM card/Memory stick before proceeding to ensure they don't get affected somehow.

*NOTE: For more information regarding this concept, please visit the tutorial on SE-NSE forums.

14) Browse to tpa\preset\system\desktop\flash and upload the custom.swf into there. DO NOT upload custom.thm here.

15) Exit the program. (Reflash your main with PhoneXS or whatever you use)

16) Reconnect your phone to your USB as you would for file transfer

17) Upload the custom.thm file onto your phone

18) Unplug USB, turn on cellphone, and browse to themes

19) You should now be able to select and implement the theme.

There you have it. Hope this made sense.


Monday, 5 March 2007

Flash-Lite-Tutorial Opens!


Welcome everyone! In a few days, I will begin posting a tutorial on how to develop and program effective flash lite menus for your cellphone!